
In 2017, we decided to finally jump on the LED grow light band wagon.
We’ve used fluorescent T5 grow bulbs for many years. They have been fine performers and helped us raise many garden seeds.
That said, there were some intriguing benefits to LED technologies, such as significant power savings and higher quality lighting.
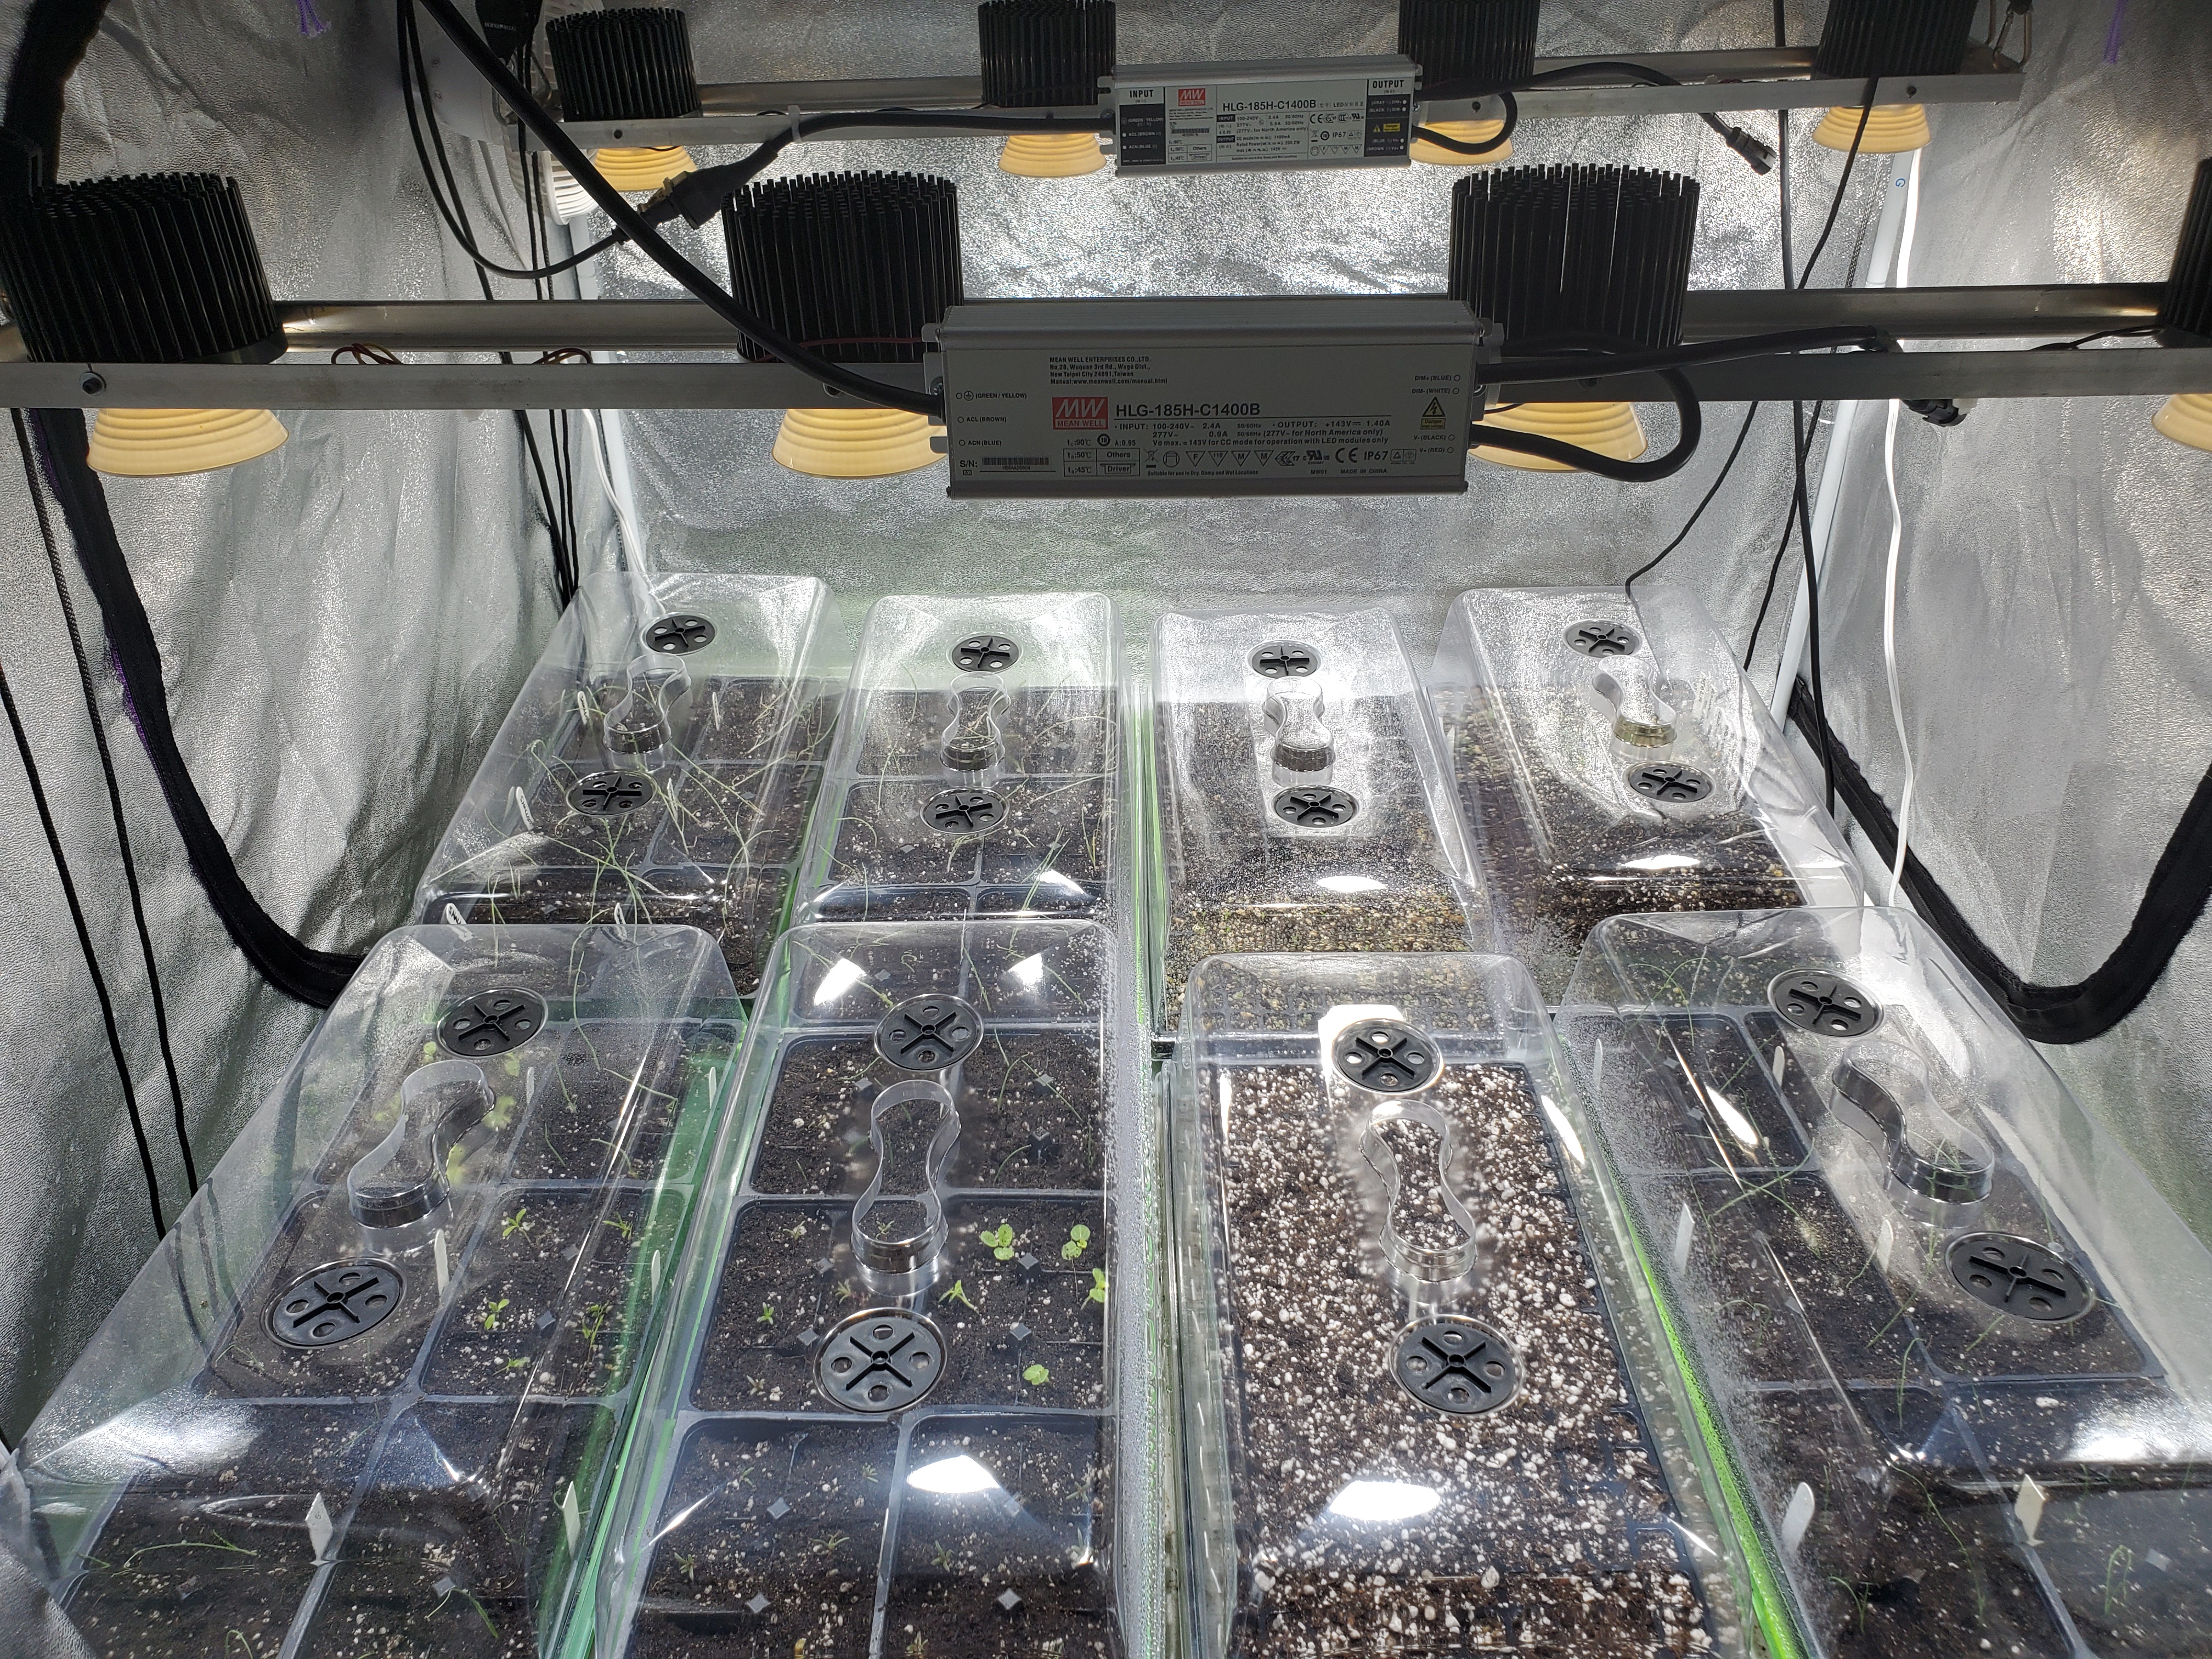
The shipment has come in and after a bit of DIY ingenuity, we have our new DIY chip on board (COB) LED lighting online!
Chip on Board (COB) LED Basics
I spent a fair bit of time reviewing modern LED technology. I was intrigued by modern full spectrum COB (or chip on board) LED’s available from companies like Bridgelux, Cree and Citizen.
Unlike the common grow LED’s that emit a blue/red/purple (blurple) color, these COB’s are designed to emit a more natural colored light.
Say what you will, I know that plants thrive on full spectrum lighting from the sun. Those “blurple” LED lights never really made sense to me. Even if they were designed by NASA.
A chip on board, or COB LED is essentially a manufactured chip that has many dozens of smaller, low-wattage LED’s on it. This lighting circuit features inputs, positive and negative, that power all the individual LED’s.
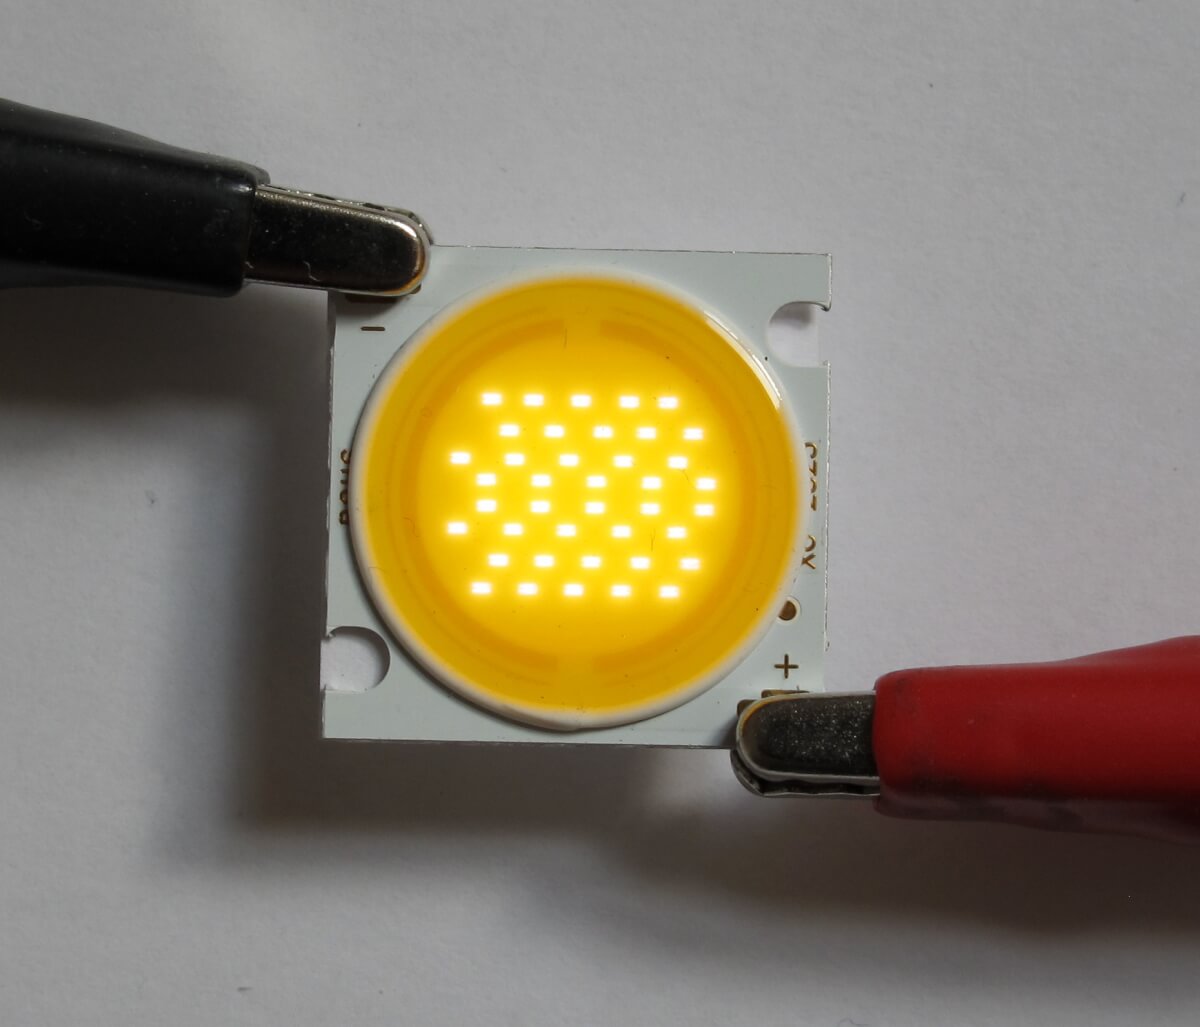 The chips are commonly rated to 100 watts, but most times running them at a lower wattage will be more electrically efficient. A coating covers the LED’s, which also helps the manufacturer control the general light spectrum that is emitted from the LED.
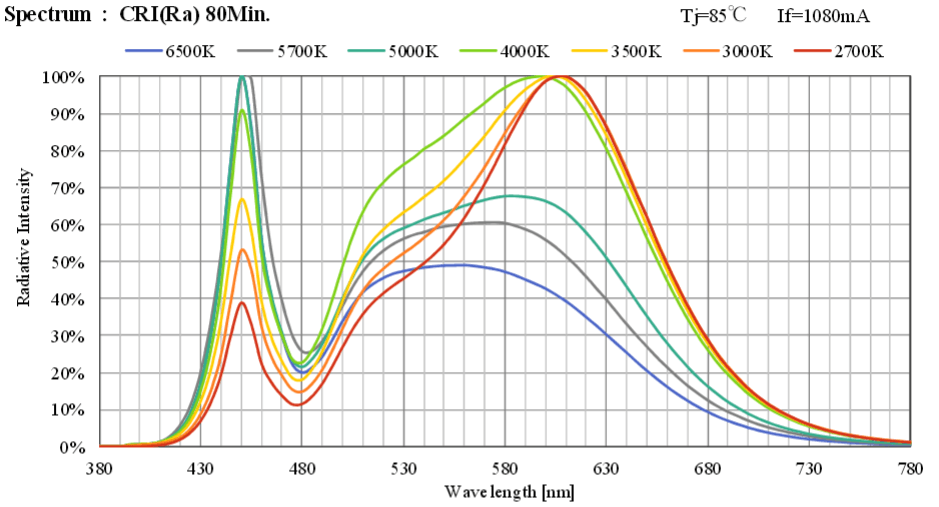
This is the spectral output curve of the COB LED’s that we purchased. You can see that it offers a wide spectrum of light.
Full spectrum essentially means that the light source will produce most frequencies of visible light. (Everything from blues, greens, yellows and reds.) This means the light will be more natural, like the sun or other common sources of lighting.
As with most indoor garden lighting, COB’s are measured in degrees of kelvin, which indicates how warm/red or cool/blue the light will generally be. Higher numbers are more blue, lower numbers are more red.
This is not exclusive in full spectrum lighting. A warmer (e.g. 3500K) LED will still produce some blue light and a cool (e.g. 6500K) LED will still produce some orange/red light.
The spectral output curve above shows what we mean by this.
The rating just indicates what the chip will produce “most” of. In general, warmer lights are better for flowering/fruiting whereas cooler lights are better for vegetative growth cycles.
Where COB LED’s Really Excel
Most intriguing to me, COB’s are highly electrically efficient.
What this means to the gardener in common terms is more growing power AND less electrical usage. After some initial testing, I found that I can get the same lighting to our previous T5 fixture with about half the power usage.
We are living in one of the most expensive areas to buy electricity in America, at 24 cents per kilowatt-hour, so every watt matters. The light will literally pay for itself in electrical savings alone.
COB LED’s are in wide-spread use across the cannabis growing industry, but little information was publicly available for common plants and vegetables.
Even though we’re growing different plants entirely, I feel this industry does a good job at evaluating indoor garden light technologies and their users give honest, straight forward reviews whether a light is good or not. What’s important to them is also important to me.
Everyone, and I mean everyone, raves about COB’s for growing marijuana. When it comes to growing lights, plants use the same light spectrum whether it’s a cabbage or cannabis plant.
The DIY COB LED Kit
I decided to take a plunge and purchased a kit from Timber Grow Lights to see how they’d do for growing garden starts. (Unfortunately, Timber Grow Lights has since discontinued their grow lighting kits, see below for more information.)
While there are commercial COB systems available, there is much money to be saved from DIY based kits. Basically, you supply the light’s frame and everything else is included in the DIY kit.
I liked Timber’s offering because they put “finishing touches” like heat-shrinking connections and offering everything that is needed in a single kit. I decided this DIY effort was fully within my means as a hobbyist fabricator.
The kit that I purchased was designed to grow cannabis and it came with 3500K COB’s, better for this plant’s flowering characteristic.
I decided that I would buy some different COB’s that would be more suitable for garden starts. I ventured on over to COBKits.com and found they had Citizen COB’s in 6500K, which would be more suitable for our purposes of early seedings and vegetative growth.
In hindsight, I could have saved some money as the 3500K LED’s would have been just fine. But, I also now have another four COB’s that I can put into production in the future.
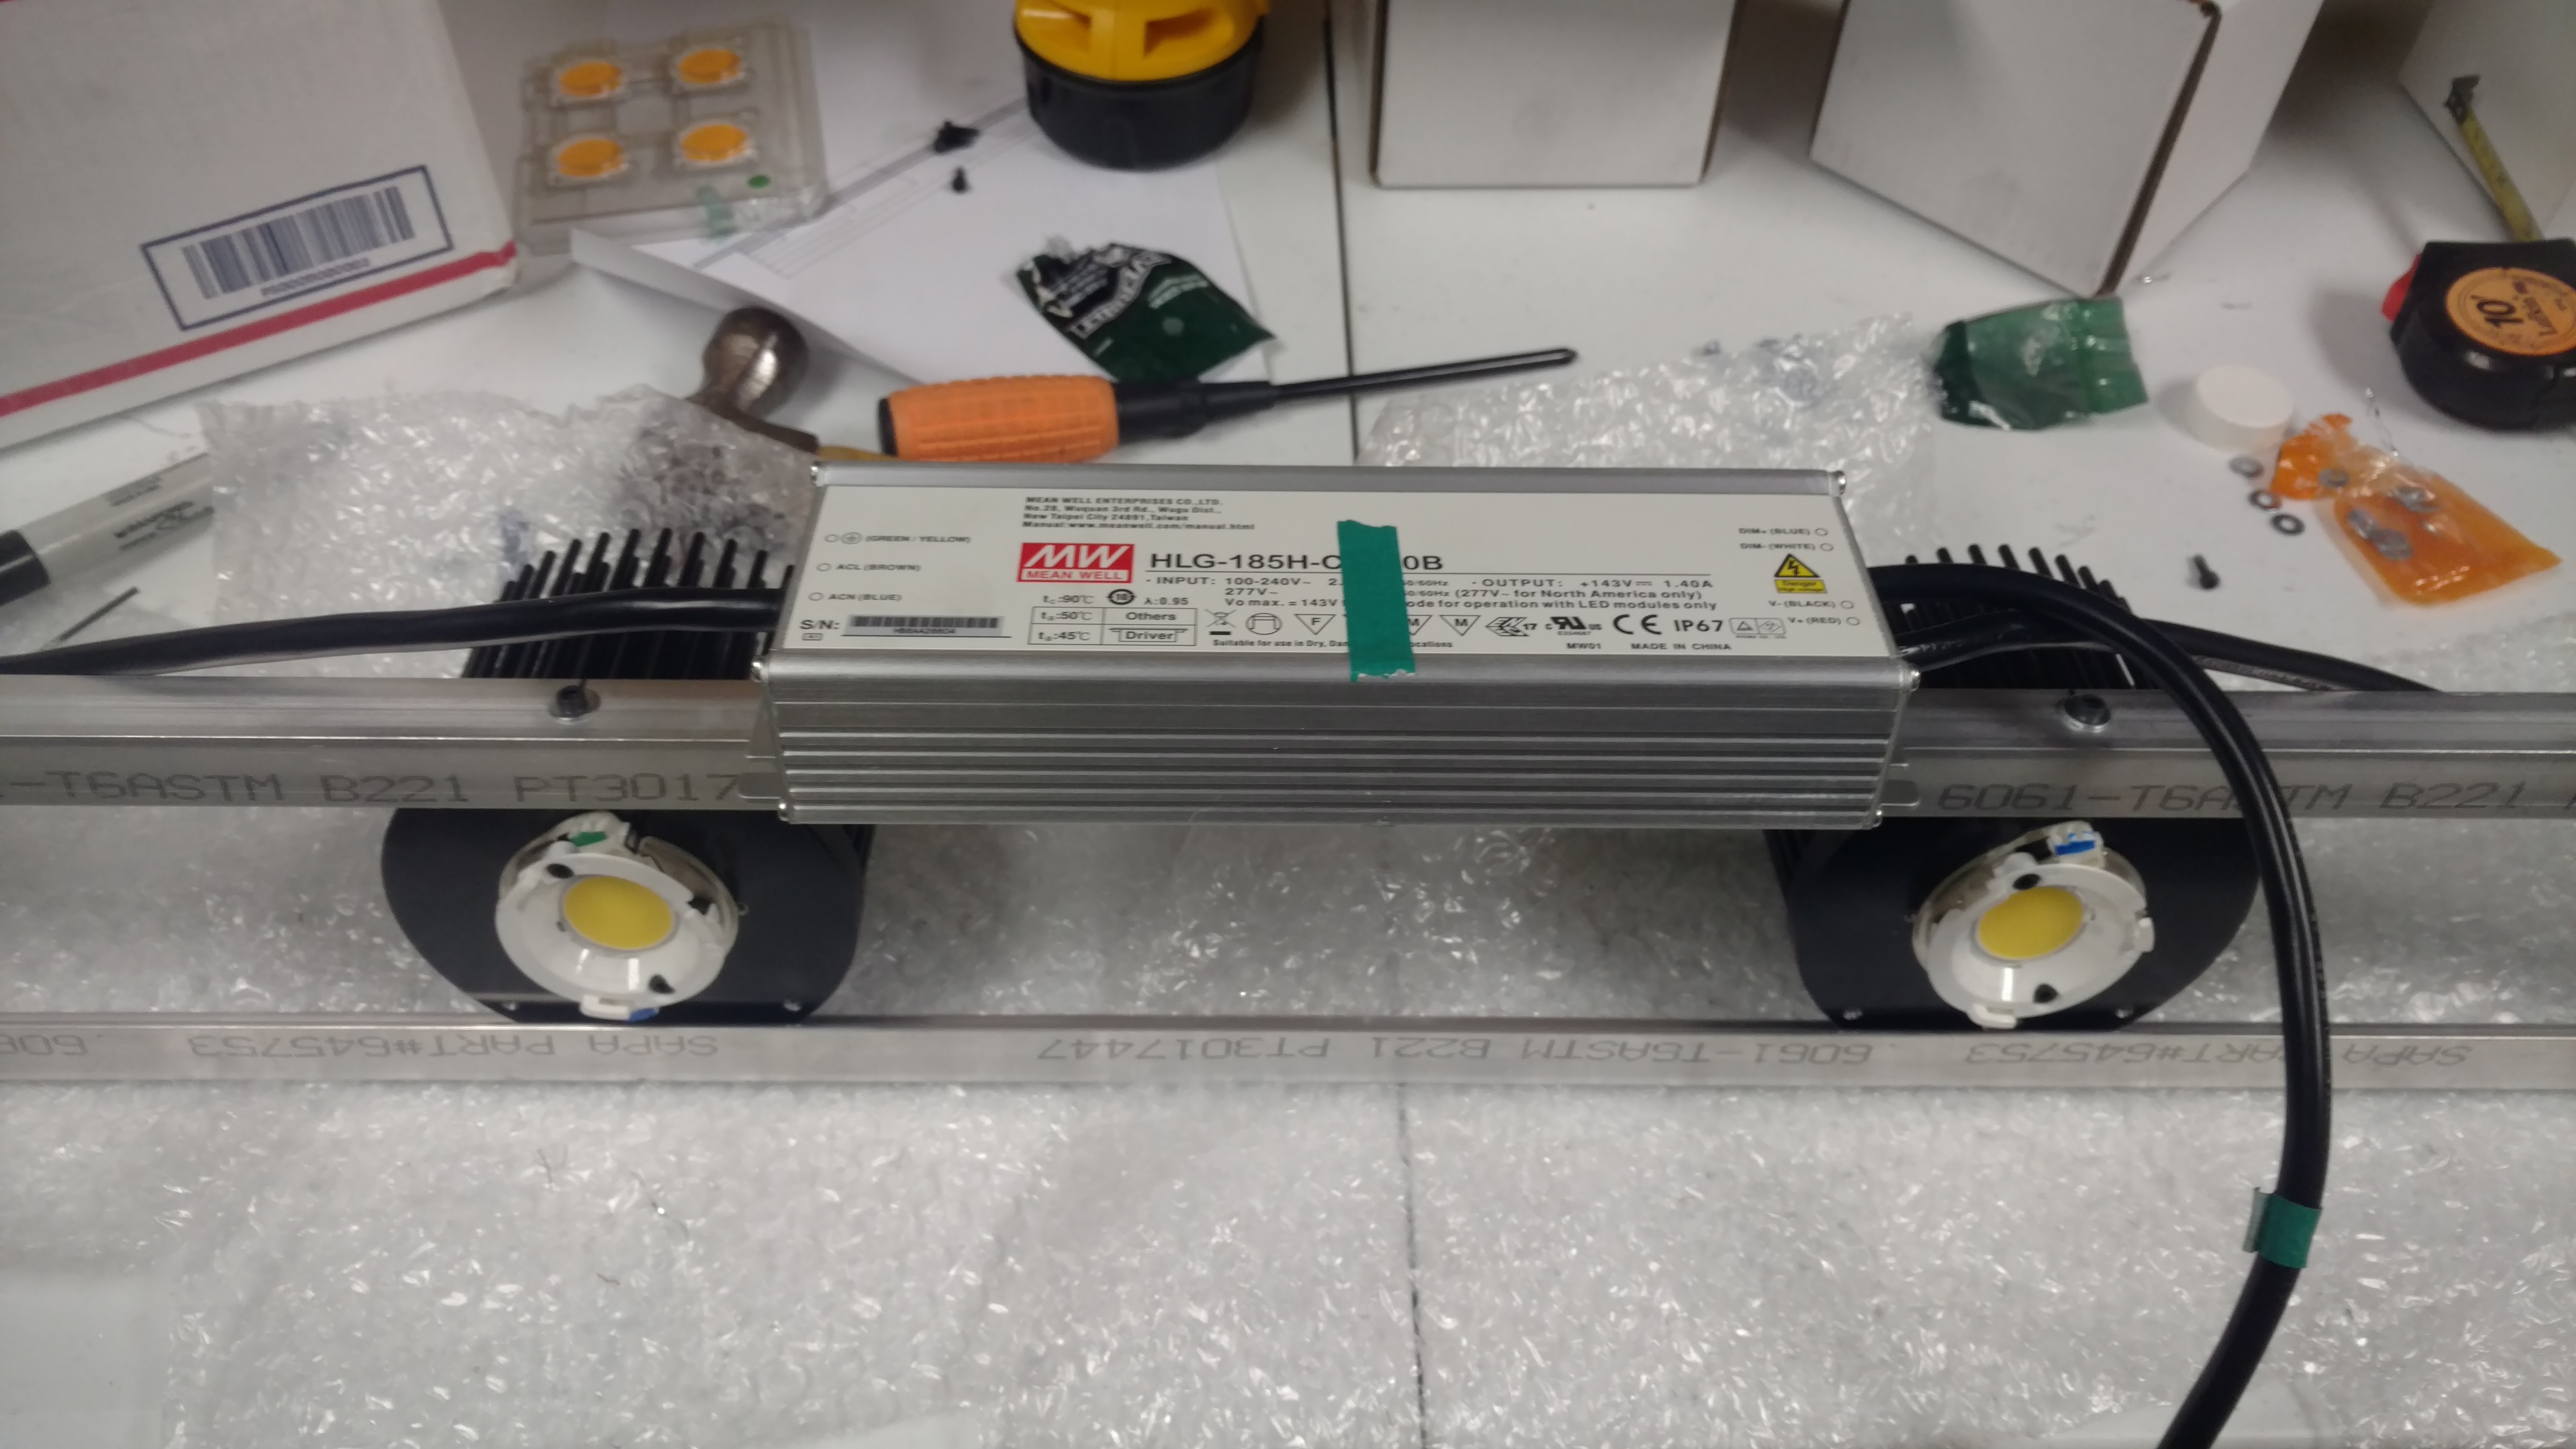
In all, the kit from Timber included the following:
- (4) Citizen 1212 COB’s
- (4) COB Holders
- (4) Light reflectors
- (4) Heatsinks
- (1) LED Driver with custom connections for power, LED’s & a dimming potentiometer
- All the necessary wiring & hardware (except frame, see below)
- Cool stickers & nice envelope with the invoice and welcome letter
- Cost: $299 + $20 shipping to Alaska
Beyond this, I had to supply a few things to get everything put together:
- 3/4″x3/4″x1/8″ aluminum angle frame
- 6-32 machine screws & nuts
- Size 6 washers
- Total cost: $12
The extra COB’s I purchased were $59, but this wasn’t entirely necessary and more of a personal preference for future flexibility.
A brief note on costs. I know I could have done the kit cheaper than I did if I designed and ordered everything from individual vendors. In Alaska, though, shipping costs are often a major factor and ordering from several different vendors will usually eat any savings you may have had.
After calculating things, the best deal for me was the kit from Timber. This also allowed me to get up and running in a few days instead of waiting 2-3+ weeks for Amazon and other places to actually get here. I want to grow plants, not dink around waiting for my project to finally arrive.
Updated 2019+ Information On COB Kits
As briefly mentioned above, Timber Grow lights no longer supplies COB kits. They do have what they call “pendant lights” but these are quite a bit different from what I purchased above.
Similar parts can be purchased from cobkits.com, which supplies most of what a grower will need to put a kit together. You’ll have to figure out which parts are needed based on the COB LED’s you’d like to use.
Unfortunately for our readers, we didn’t go this route. Which means you’ll need to do a bit more learning than what we offer in this post. You essentially have to make sure the LED driver is electrically appropriate for the number of LED’s that you want to run.
There are a number of forum posts and websites that detail parts that will work well together. Remember, you’re playing with electricity – so it’s important to know what you are doing!
It would also be appropriate to mention that our 2020+ recommendation for LED systems is currently Quantum Board LED’s. These are much more friendly to the grower and don’t require DIY processes.
Overall, the above kit was really nice. But alas, things change.
Building The DIY COB LED From A Kit
 The DIY process wasn’t terribly difficult, but being my first one, there’s a number of things I would do differently. My cobbled together effort has lasted for many years now.
Overall, without little guidance, it took me about five hours to assemble the frame and wire up the light. (Spoiler alert, my second DIY COB light took much less time.)
The only tools required were a drill, screw driver, adjustable wrench, hex bit and a multi-meter.
My first test of the lighting didn’t work, so I had to break out the multimeter. I figured out one of my connections between the COB and COB holder was not making good contact. Easily fixed and I was off to the races.
This was actually a good experience as I learned several things about how COB’s work and how to diagnose the system if things go awry later.
After I made sure the default kit worked, swapping in the other LED’s I purchased was super easy. I just had to unscrew a couple of hex screws, clean the heat sink with alcohol, insert the COB into the holder and apply new thermal protection. (Similar to what you’d do when installing a CPU fan in a computer.)
The replacement LED’s were considerably more blue, which is perfect for my particular application of raising garden starts. I’m sure the 3500K LED’s would have been fine as well, as these still produce blue spectrum light. I’m going with what I know about indoor horticulture and it probably gives me a little bit of an edge.
I was impressed that other than aluminum angle bracket and frame hardware, I didn’t need anything else that wasn’t in the kit from Timber. It was practically plug and play as far as DIY kits go.
Thoughts On The DIY COB LED
With all that out-of-the-way, my thoughts are that this new lighting is stupendous!
First, this light is ridiculously powerful. I don’t have means of measuring PAR, but I can measure lux. I can say the output of the COB’s at 18″ is easily twice that of a 6-bulb T5HO light right beneath the bulbs.
I’m seeing 15,000 lux under humidity domes 22″ away. I’m glad I took a minute to measure the output before putting plants under it. This light is a potential plant killer if not used carefully.
We hang our COB LED’s around 24″ from the the grow table’s surface. We are getting very acceptable coverage across four 10×20 trays side by side.
I use a lux meter on my phone to dial in the lights to the desired level, for which I used my T5’s measurement as an initial reference. We experimented with a few different levels. We’ve basically figured out that between 15,000 and 25,000 lux is about as high as you’d ever want to go with baby plants.
The COB LED’s do raise room temperature by a few degrees Fahrenheit. (Not bad.) The heatsinks get warm to the touch, but not much warmer than my T5 fixture. Overall, the LED’s are radically better at controlling heat compared to older, incandescent bulbs. (Heat is one of the main reasons we went to fluorescents originally.)
During our many years of ownership now, we’ve moved our COB’s to be semi-permanent fixtures in our year-round grow tent. We have few problems with heat buildup and our exhaust fan only runs when our home is particularly warm. (i.e. summer)
Visually, the light from the 6500k COB LED’s is quite similar to our T5’s output. Interestingly, though, it seems more “precise” from a visual perspective. Perhaps a little less warm than the 6500K bulbs we have in our T5 fixture, but definitely the same color range.
The buy in cost for the LED’s is higher than the average lighting, but the electrical savings make it worth it in the long run.
For comparison, I paid around $220 for my current 6-bulb T5HO’s and bulbs run me about $10 each to replace. (I replace 1-3 every year.) Given that I should see a 10+ year run out of these LED’s and lower operational costs, the LED makes a lot of sense financially.
Turning The COB Knob Up To 11
I‘m writing this section now, four years after originally writing this article.
I wanted to provide a little bit of reflection about the decision to learn about and build our own LED COB lighting. Was it worth it? What would we change?
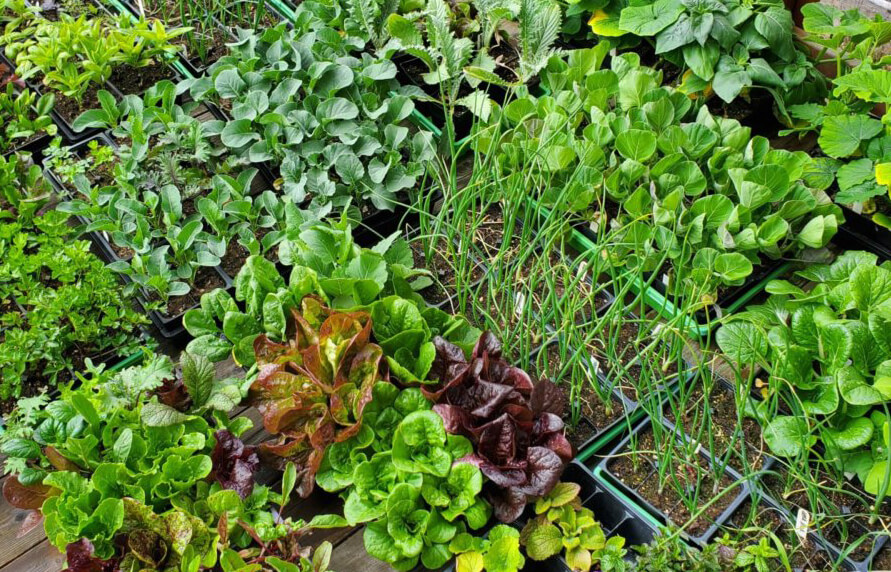
These lights have been terrific performers. We installed them into our 4×4 tent and have raised thousands of garden starts with them.
We are consistently able to bang out strong, compact plants with these. We see overall more plant resilience in hardening off practices and great growth.
Energy wise, they are every bit of electrically efficient as one could hope. Our old T5 lights pulled 432 watts at the wall. These cover more space at less than half that draw, or about 200 watts each. Our entire 4×4 grow tent is now sub-500 watts (with cooling) from the wall!
Our DIY ingenuity appears to have held up over the long term. No major issues. We did eventually see that both the potentiometers “burned out” on our kits. Fortunately, the light operates at full power without the potentiometer installed.
I don’t think there’s a better way to cover a 4×4 grow tent with 400 watts.
Frosty Garden’s Current LED Lighting Opinion
We did this project back in 2017. This page is still popular on our website, though. It was a fun project that’s been a reliable workhorse in our indoor garden.
When we did this, LED lighting was still very “boutique” and very, very expensive to get into. A DIY project allowed us to adopt the technology without breaking the bank.
Our indoor garden is now 100% LED based. We’ve moved on entirely from our old T5 fluorescent lighting.
Our current recommendation, however, would be to go with a slightly newer technology called Quantum LED Boards. These are nearly as efficient as this project and just as powerful as DIY COB’s. Without all the DIY effort.
We added two 90 watt quantum board LED’s to our garden kit in 2020. (And two more in 2022!) We use these on what we call our “overflow table” – where we keep most plants that we’re actively hardening off or moving outside more frequently.
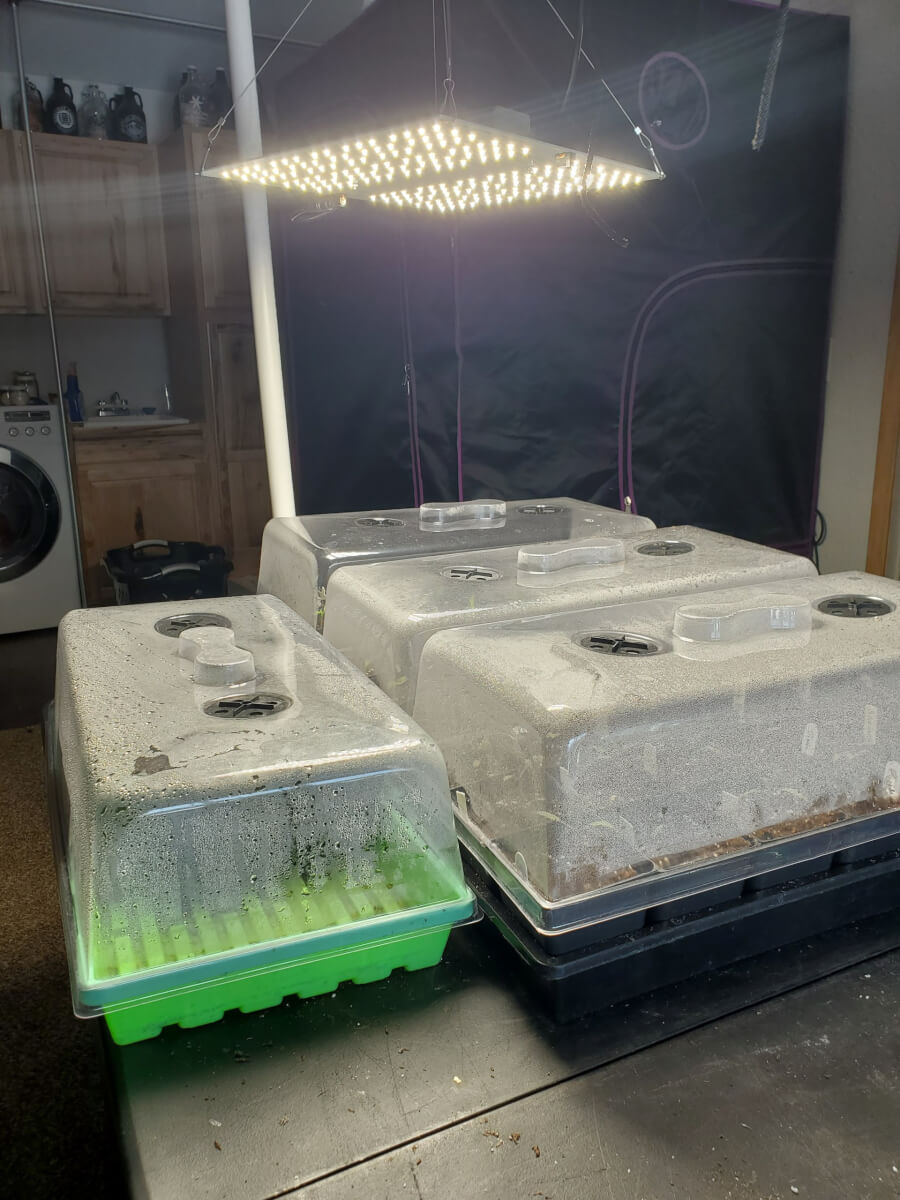
While there are plusses and minuses to both technologies, the convenience factor of quantum board LED’s make them a clear winner. They are nearly as powerful and equally electrically efficient, out of the box.
If I were doing a 4×4 tent these days, I’d probably hang four 100 watt quantum boards. There are also “large” versions of the quantum boards available which can cover larger areas.
I think the ability to “spread out” your lighting provides for significant benefit in overall coverage. Unless there is a significant cost driver, I’d favor more lights over more powerful centralized lights.
However, if you’re interested in going down the path of DIY lighting, there’s a lot of good knowledge out there. I had a lot of fun learning about the technology and it wasn’t terribly expensive when done DIY.
It’s a worthy pursuit if you’re the maker type.
That’s All We Wrote!

Having a good time? We have an ever growing list of insightful and helpful subarctic & cold climate gardening articles, waiting out there for you!
- Cold Climate Gardening Basics 👉
- Growing Your Garden From Seed Indoors 👉
- Advanced Cold Climate Gardening Techniques 👉
- Plant Specific Cold Climate Growing Guides 👉
- Subarctic Perennial Food Forests & Foraging 👉
- Indoor Garden Lighting & Grow Rooms 👉
- Greenhouses & Temperature Control 👉
- Harvesting & Food Preservation 👉
- Solving Cold Climate Garden Problems 👉
- 1 Minute Reads On Tons Of Garden Topics 👉
FrostyGarden.com is 100% ad-free and we do not use affiliate links! This resource is voluntarily supported by our readers. (Like YOU!) If we provided you value, would you consider supporting us?