
This post explores some of the methods and equipment that we use to perform temperature control in greenhouses.
We discuss how to figure out heating requirements, how to configure temperature controllers and other topics related to greenhouse temperature control.
While this post is still quite popular and relevant on our website, we have moved on to newer, DIY techniques for seedling greenhouses in our gardens!
Why You Might Want A Small Greenhouse?
Fortunately, greenhouses aren’t a requirement to grow in almost all cold climates, but they can be extremely helpful to the cold climate grower.
 The greenhouse provides the grower two major advantages in cold climates.
The most useful purpose of the greenhouse is allowing you to put your garden starts outside well before it’s normally safe to do so for frost reasons.
Most basic greenhouses will raise your frost zone by one whole zone, which usually translates to about two weeks on either side of the season.
When you can heat that greenhouse, it can be a safe environment for many of your garden starts a month (or even more!) before your typical last frost.
The second most useful purpose of a greenhouse is to provide warm weather crops a more ideal environment for their growth. This is also valuable in cold climates, but not nearly as critical as freeing up your indoor grow space in the early spring.
This post will focus on the most important use. Getting at least some of your garden starts outside well before it would normally be safe to do so.
Inventing A Small Greenhouse Solution
There are a lot of reasons that someone might not have a greenhouse. You might be a renter or apartment dweller. You might not have the space. Or, you might not have the money, time or skill to build or buy one.
We were in the category of A) Didn’t have a greenhouse, B) Couldn’t build one and C) We needed something because we wanted to grow a lot of plants.
So, we kind of pioneered something that isn’t super well documented out there. The strategy has become an integral part of our cold climate growing process.
The important take away in this post? A greenhouse doesn’t have to be a permanent structure. It can be a temporary structure that can be put up and taken down each season.
Building The Small Temperature Controlled Greenhouse For Garden Starts
What we decided to try to figure out is if we could temperature control a relatively inexpensive greenhouse from Amazon.
Our plan essentially turned out to as follows:
- Cheap, small greenhouse
- Temperature controller
- Small, inexpensive space heater
- 6 inch personal clip-on fan
We were able to pick up a couple inexpensive Gardman Greenhouses on Amazon fairly inexpensively. They usually go for around $40, but we were able to find them late season and discounted down to $25.
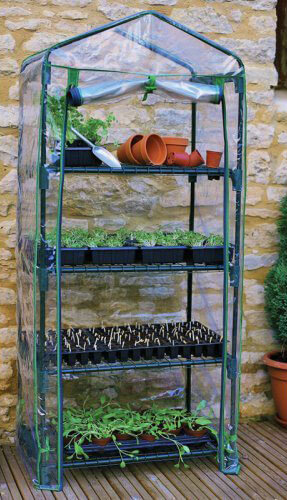
The unit features 4 shelves, for vertical space savings, and a zip up front access that allows watering of the plants and venting.
It’s a “cheap” greenhouse, but we expect with a few zip ties and anchors, that it should be reasonably decent for at least a season or two. (See our updates at the end of the post.)
It probably goes without saying, but we clearly break this greenhouse down for the winter. This type of greenhouse is just not robust enough to handle an Interior Alaska winter!
The Thermal Reality Of All Greenhouses
The problem with any greenhouse, hoop house or cold frame is always going to be temperature.
Absent external heat, the temperature within the greenhouse can get down to ambient air temperatures quite easily. If outdoor temperatures are below freezing, your plants will also be below freezing.
Only the hardiest of cold weather crops can sustain a good freezing.
By design, a greenhouse can also trap a lot of heat. A LOT of heat. It’s not uncommon for a greenhouse or cold frame to get 120+ degrees Fahrenheit on a nice 60 degree day.
It’s always necessary to ventilate a greenhouse, either manually or through some automated fashion.
For us, we don’t always have the leisurely time to ensure our greenhouse is either enclosed or vented properly, based on the conditions. It was strongly desirable for us to automate the climate conditions, with both heat and cooling.
We also didn’t want to dump a huge amount of money into this temporary greenhouse project. The whole point was for it to be relatively cheap.
Setting Up Temperature Control Of The Small Greenhouse
We really wanted a way to ensure that our plants won’t get killed off by frost at night.
I simply don’t trust a $25 greenhouse to maintain heat well enough to prevent catastrophe from freezing temps.
The idea was to heat the greenhouse with a small space heater to prevent frost from setting in under any circumstances. But, we also wanted to save electricity and only turn on the heater when needed. All we really needed was just to maintain an absolute minimum temperature of my choosing.
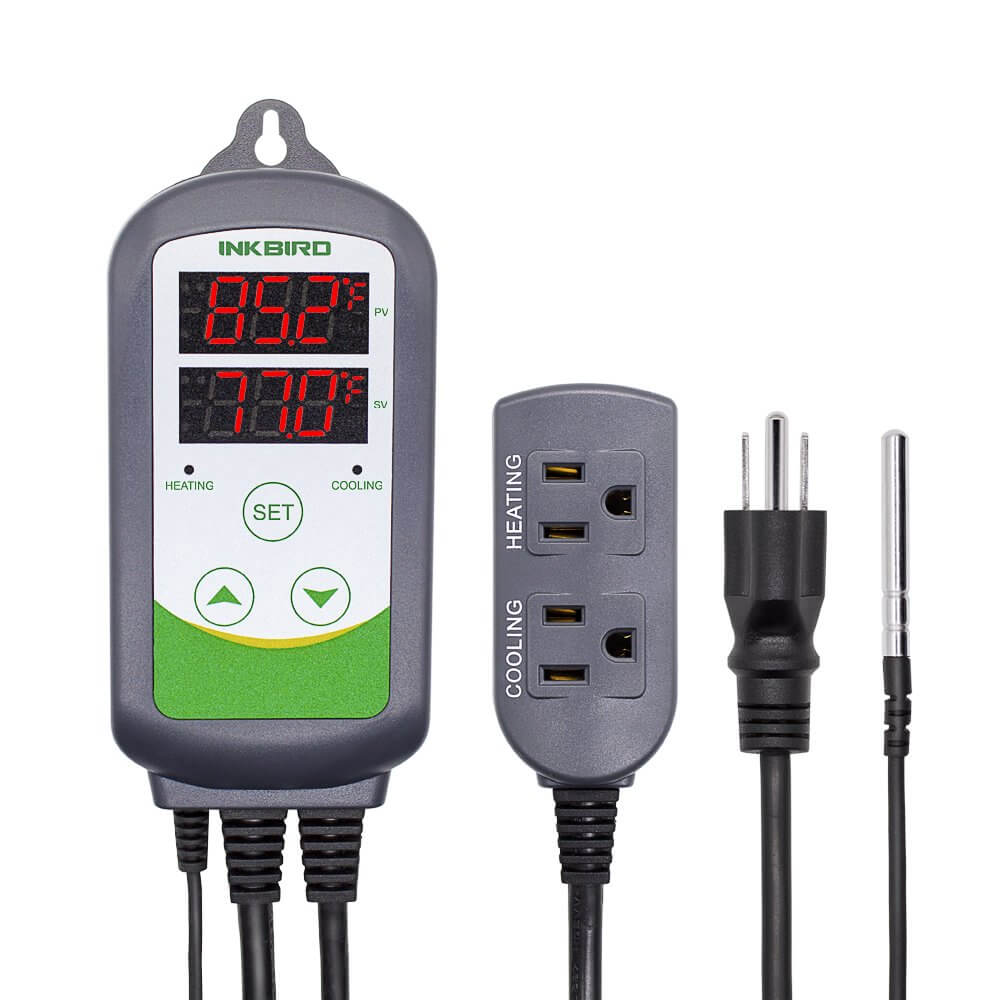 Enter the Inkbird ITC-308 temperature controller! This brilliant little device offers relatively inexpensive high and low temperature control.
This temperature controller features a temperature probe that continually measures the temperature. When the greenhouse gets too cold, it can turn on a heater. When it gets too hot, it turns on a fan to help vent the hot air outside.
Figuring Out The Small Greenhouse Heating & Cooling
We are not trying to heat a large room here. This greenhouse is at most 12 cubic feet.
We only need to heat that space to 40 degrees Fahrenheit or so, or 10 to 15 degrees above the expected outdoor low temperatures in late April and May.
These minimal requirements seemed like a fairly easy target to hit. The problem was, I had no idea how to figure out what I needed to know.
How many BTU’s are needed to heat this space to the stated requirements?
So, I proceeded to teach myself a bit about the BTU requirements of heating greenhouses. At least enough for this application.
When I first ventured into this, it felt like I was trying to learn some great feat of engineering. It turns out, there’s basically calculators out there on the internet you can use to figure it out or check your work with relative accuracy.
I was thrilled when I figured out that, with my requirements, I could get by with a reasonably low wattage space heater.
The Lasko 100 “MyHeat” 200 watt space heater seemed to fit the bill here and also fit the “cheap” requirement, coming in a measly $15 each.
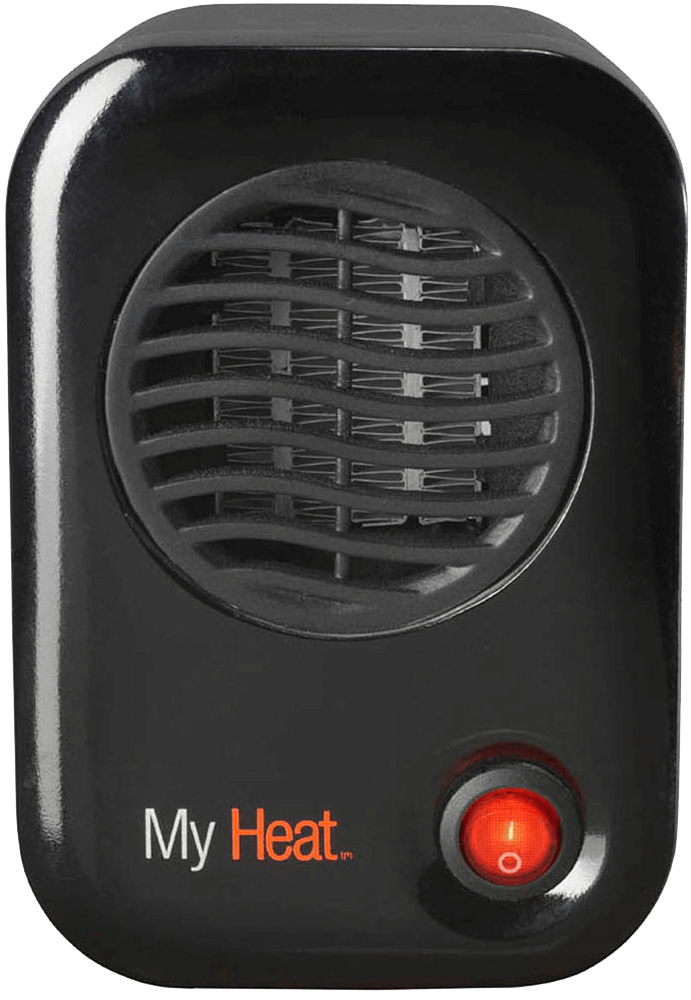
The power usage was right up our alley too, it would cost about $10 a month to run for eight hours a day. It would likely run much, much less than that.
For cooling, we chose a small 6 inch personal fan to assist the venting and that seemed to do well.
We just have to point the fan towards the greenhouse zipper and crack the zipper door on days we expect the greenhouse might get hot.
We haven’t had problems with 90+ degrees in the greenhouse, so the 6 inch fan seems to be sufficient.
Configuring The Temperature Controller For Optimal Temperatures
The temperature controller allows a few important settings that we will need:
- Temperature set value
- Heating Differential
- Cooling Differential
The temperature set value is fairly clear, it’s the desired temperature.
The differentials are essentially the difference from the desired temperature before you engage either heating or cooling.
What we want is for the temperature controller to turn on the heater at 40 degrees Fahrenheit and turn on the fan at 75 degrees Fahrenheit. Here’s how we did that:
- Temperature set value: 45 degrees Fahrenheit
- Cooling Differential: 30 degrees Fahrenheit
- Heating Differential: 5 degrees Fahrenheit
The heater will kick on at 40 degrees, which reflects five degrees less than the temperature set point. It will heat the space to 45 degrees and then turn the heater off.
The heater is on the bottom shelf and since heat rises, it warms the entire greenhouse. We also found that placing a blanket on top of the greenhouse helped to trap heat from the heater.
For cooling, the fan will turn on at the expected 75 degrees, or 30 degrees warmer than the temperature set value. All we have to do is zip open the door of the greenhouse on days where we expect the fan will come on. That’s most sunny days and definitely days over 50 degrees.
The “bad” part of these inexpensive temperature controllers is they work on a single temperature set value concept.
Given the above settings, the fan will try to cool the greenhouse down to 45 degrees Fahrenheit. On a warmer day, that’s impossible, so the fan will continue to spin until the evening when temperatures cool down again.
The only way to prevent this behavior is to use two separate temperature controllers for heating and cooling.
Your particular settings might be different from ours. There’s no perfect way to set them up and a number of settings would work.
Scaling This Up To A Real Greenhouse:
There’s a couple things that will change if you were to scale this concept to a larger greenhouse. The same concepts apply as a small greenhouse. You can read about how we temperature controlled our large greenhouse here.
First, the heating of the greenhouse. The small heater specified above will do almost nothing in a larger greenhouse. Essentially, you have to figure out the BTU required for your space and have a heater rated for that space.
It can get really expensive to do this, either through electricity or a fuel based systems. For a lot of greenhouses, a 110V electric heater just won’t be enough.
We ended up sealing our large greenhouse with UV rated plastic to help cut down the costs of greenhouse heating. It has worked wonderfully!
When it comes to cooling, you would also use a different fan or even multiple fans. For most moderate sized greenhouse applications, I would select at least one standard 16 inch inline fan.
You can calculate the needed CFM (cubic feet per minute) for your greenhouse with an online calculator.
Such fans would be installed on a wall, somewhere in the greenhouse. I would also install a vent on the opposite side of the greenhouse to allow air to flow through the greenhouse.
This calculator can tell you how big the vent needs to be based on the CFM of the fan. Both would feature louvers that would close automatically when the fan wasn’t running.
It might be a better solution to use something like the smaller greenhouse we talk about to raise your garden starts. Then, use the larger greenhouse to grow a large supply of warmer climate vegetables over the summer.
That’s how we roll here as it saves immensely on heating costs.
Better yet, you could put a smaller greenhouse inside your larger greenhouse. This would effectively give you two layers of greenhouse protection. Each layer of greenhouse protection gives you almost an entire zone of growing advantage!
That would result in very little heating needs, even 4-6 weeks before your typical last frost. Remember, both greenhouses would need to be vented, so that would mean two sets of these temperature control systems.
Additional Notes On Small Greenhouse Temperature Control
There are a few obvious safety precautions with this setup.
The heater’s output should be kept relatively free of cords and other obstructions. It’s not a very powerful heater, but you should also make sure it’s not pointed right at the plastic exterior of the greenhouse or other flammables.
Also, water and electronics don’t mix, so be careful when watering. Better yet, move all the plants out to water them.
We like to monitor peak low and high temperatures via a wireless thermometer. It is nice to be able to tell when we’re starting to push the limits of the heater or if we need to adjust the fan a bit.
In our experience with this solution, when you push to get your plants outside 4-6 weeks before last frost, you need some additional heat. We install two of the 300 watt heaters to use through April and this allows us to heat against temperatures well into the teens.
Final Thoughts On Small Greenhouse Temperature Control
We are super pleased with this combination and have used it for several years now. Our migration of some of our transplants worked out exactly as planned.
This inexpensive solution has worked according to our expectations. We’ve been able to heat against evenings even in the low twenties with no troubles. Sometimes that heater kicks on a lot, but it’s not super expensive to run. At only 200 watts, it’s not racking up a major electric bill and that’s piece of mind for us.
For basically the ~$100 budget I had planned to put together a DIY cold frame out of poly and PVC, I was able to put together two thermostatically controlled small greenhouse setups that has more than enough room to handle our moderately sized transplant operation.
This was a huge win for us in our garden.
Longevity Updates For Our Small Greenhouse Temperature Controlled System!
Longevity update: We’ve now used this set up for two years and it has worked quite well. The greenhouses have held up reasonably well, despite being stored outside in sub-zero temperatures most of the winter. It is a huge benefit to have somewhere other than the indoor grow room to put plants, especially as we get into May when grow space is at a premium. We prefer to move our cool weather plants out into this, while keeping our warm weather plants inside for maximum protection. This has allowed us to put off getting into a production greenhouse, although this is still in our plans.
Longevity Update 2: Well, it couldn’t last forever for $25. In the third year, the plastic tore away from the zipper seam on one of the two greenhouses. Amazon does sell replacement covers for the 4-tier and 5-tier greenhouses. These have been inexpensive enough and we try to pick them up when they go on discount, typically outside gardening season.
Longevity Update 3: Unfortunately, the above failures have continued. The replacement covers also seem to be degrading in quality from year to year. Don’t get us wrong, this worked well for us, for many years. We now use a DIY solution for our small greenhouse, also fully temperature controlled. This will hopefully be a more sustainable solution.
That’s All We Wrote!

Having a good time? We have an ever growing list of insightful and helpful subarctic & cold climate gardening articles, waiting out there for you!
- Cold Climate Gardening Basics 👉
- Growing Your Garden From Seed Indoors 👉
- Advanced Cold Climate Gardening Techniques 👉
- Plant Specific Cold Climate Growing Guides 👉
- Subarctic Perennial Food Forests & Foraging 👉
- Indoor Garden Lighting & Grow Rooms 👉
- Greenhouses & Temperature Control 👉
- Harvesting & Food Preservation 👉
- Solving Cold Climate Garden Problems 👉
- 1 Minute Reads On Tons Of Garden Topics 👉
FrostyGarden.com is 100% ad-free and we do not use affiliate links! This resource is voluntarily supported by our readers. (Like YOU!) If we provided you value, would you consider supporting us?
Random question….but I live here in Fairbanks and I am starting my first garden this winter/beginning of spring. I started in my garage a couple weeks ago. I was looking on Amazon for this exact greenhouse a couple weeks ago but all the sellers said they wont ship up here. Do you know which seller you used by chance? Or where I can get something similar that will ship? Walmart doesn’t have in stock and wont ship here either apparently.
Howdy neighbor! Ours was the Gardman brand, linked here. I just checked and it looks like it does ship here, for free, and seller is Amazon itself for a price of $42.94 right now. I hope that helps! Good luck with your garden and thanks for reading!
This has been very helpful. I have had a greenhouse approx 8 x 5′ and haven’t really been able to use it because I didn’t think I would be able to control the temp. So is it basically the same idea to control the temp from getting over 70/80 deg? What would you suggest
Exactly. If you use a dual-zone temperature controller, you can hook the “heat” side up to a heater and the “cool” side up to a vent or a fan. Usually you’d want to only heat up to 40, or maybe 50 degrees, basically enough to protect from freezing. Your vent (or cooling) would kick on at 70 or 80 degrees, or whatever maximum temperature you want. Your fan may run a lot if ambient temperature is above that setting, but that won’t hurt a thing. You can find greenhouse fans on Amazon for fairly cheap, the kind that have closing vents will reduce undesired heat loss at night. Good luck!
Super useful article. Do you have any photos of your small and large greenhouse installations? Gracias.
We did capture some this year. We are making some major changes to our site here and one of the tasks is to go through all the current major posts and edit the content more thoroughly, along with posting additional pictures we’ve taken since this was written! Maybe check back in a month or two. Thanks for reading!
Hi- do you start seeds in this greenhouse or move the seedlings? I have this exact greenhouse and don’t have much (any) room to start seeds indoors. Was really excited to find your article, this is exactly what I was looking for.
Hi Kristin! Thanks for the comment and we’re glad you found this helpful! We don’t start seeds in this greenhouse. It might be possible, but my main concern would be the relatively low temperatures it can experience. Although you can theoretically heat against it, depending on how cold it gets, it can easily be colder than is needed for germination purposes. There is definitely room for experimentation, though, so don’t take that as us saying it won’t work!
I would suggest you also look into what is called “winter sowing techniques.” This is basically the process of using something like a milk jug to create a mini greenhouse. You cut the container in half, put soil in the bottom, plant your seeds and then “seal” the jug up with tape. Place them outside about 8 weeks before last frost. The seeds will germinate when conditions are right, typically providing adequate starts for your garden! This will work great for many cold hardy plants, especially brassicas and other frost tolerant plants that need about 8-10 weeks to be ready. We will be testing this technique this year so we can write a proper article on this subject!
I have been thinking about this even further. I don’t see any reason why this greenhouse wouldn’t work for most cold tolerant crops. Functionally it would be better than winter sowing, as mentioned above, since it would be heated to a minimal temperatures.
The drawbacks would be limitations on really early crops, such as onions, that have to be seeded well before it would be reasonable to heat against outdoor temperatures. You’d also be limited to colder crops only. Things like tomatoes/peppers would be really difficult to germinate in this and might not survive the relatively cool temperatures they will experience. For all warm weather crops, you’d really need to protect them a bit more than what you can do with this greenhouse.
Thanks so much for the great information. We have 2 greenhouses now…just beginners with it so your shared experience will really help. I like the tips to balance humidity and temperature economically.
We bought a great (2nd) small walk-in greenhouse with 6 plant shelves at Aldi’s this week ((April special) for 39.99 with shelves. Dimension 4.7′ x 2.4′ deep 6.4′ at roof apex. No tools needed easy to put together with roll up door.
Thanks!
You are welcome and thanks for the thoughtful comment! We are trying something different this year and trying to improve on some of the shortcomings, but these cheap greenhouses have worked for many years for us!
Hi we got one for my succulents to use only when we have a freeze nite or maybe too much rain. Im only putting in the succulents that dont like rain . Hope it works.
You only run a major risk if the plant goes below its minimum temperatures. Greenhouses inherently do protect from frost and colder temperatures to some degree. But, there are outdoor temperatures where you can get frost, even in a greenhouse. That’s one of the reasons we went through the effort to heat ours. Good luck, hope it all works out for you!