
Listen To This Article!
We’ve long been fans of trying to get our plants outside sooner in the season, well before last frost dates.
Put simply, we haven’t always had the luxury of a climate controlled greenhouse. So, we’ve put a fair bit of effort into making other, less expensive techniques work.
This post is a general build guide for a fully climate controlled, DIY seedling greenhouse! Perfect for getting small plants outdoors early in the season, but still protect them from early frosts!
The DIY Seedling Greenhouse Scope
Let’s be clear about what we are trying to build here. We aren’t trying to build a greenhouse that can house full-size plants and be used throughout the season.
Our general goal is to get a relatively good sized space to put seedlings in.

For us, having a space to put seedlings in prior to our last frost days provides a number of advantages. It reduces our indoor lighting costs, our overall lighting needs and also reduces the overall cost of our seed starting operation.
The space needs to be climate controlled, with an appropriate heater and ventilation, to keep the greenhouse from becoming too hot or too cold.
For our design, we wanted it sized for the 1020 tray system that we heavily use in our from seed garden start development.
Ideally, it would offer us enough space for all of our seedlings and enough height to handle our tallest plants, like tomatoes.
Small Temperature Controlled Greenhouses, Evolved
We started using this “small greenhouse” concept rather early in our northern gardening experience.
In years past, we used inexpensive Gardman brand, shelf based greenhouses to help us get our seedlings outdoors. This worked well enough for many years, but it eventually became quite wasteful.
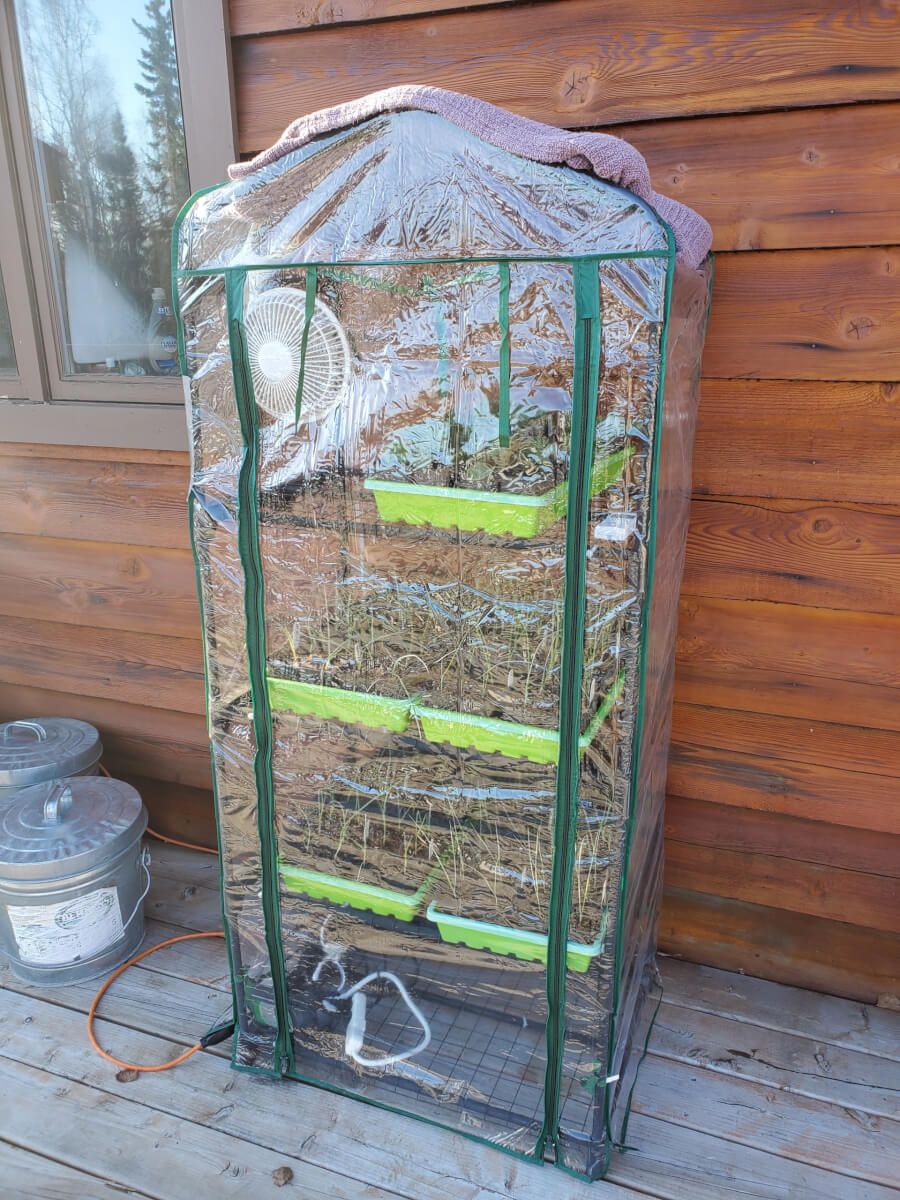
We used inexpensive greenhouses, with temperature controls, for many years. Ultimately, we got fed up with the poor quality of the greenhouse covers, which would often break within weeks of installing a new one.
The greenhouse covers for these units are quite poor in quality, to be honest. The quality seemed to get worse and worse every single year. It got to the point where we could barely get a few weeks of use out of them before they tore apart.
The ideas we have in this post were a bit of an upgrade to this same concept. We wanted something that was a step above, more capable and would last from season to season.
The Perfect DIY Seedling Greenhouse Materials
When you’re building something that is temporary in nature, you have a lot of flexibility in construction material choices.
We selected PVC for our seedling greenhouse build. Our “favorite” PVC size for general, lightweight construction like this is 1″. It’s rigid enough to get the job done without being overkill.
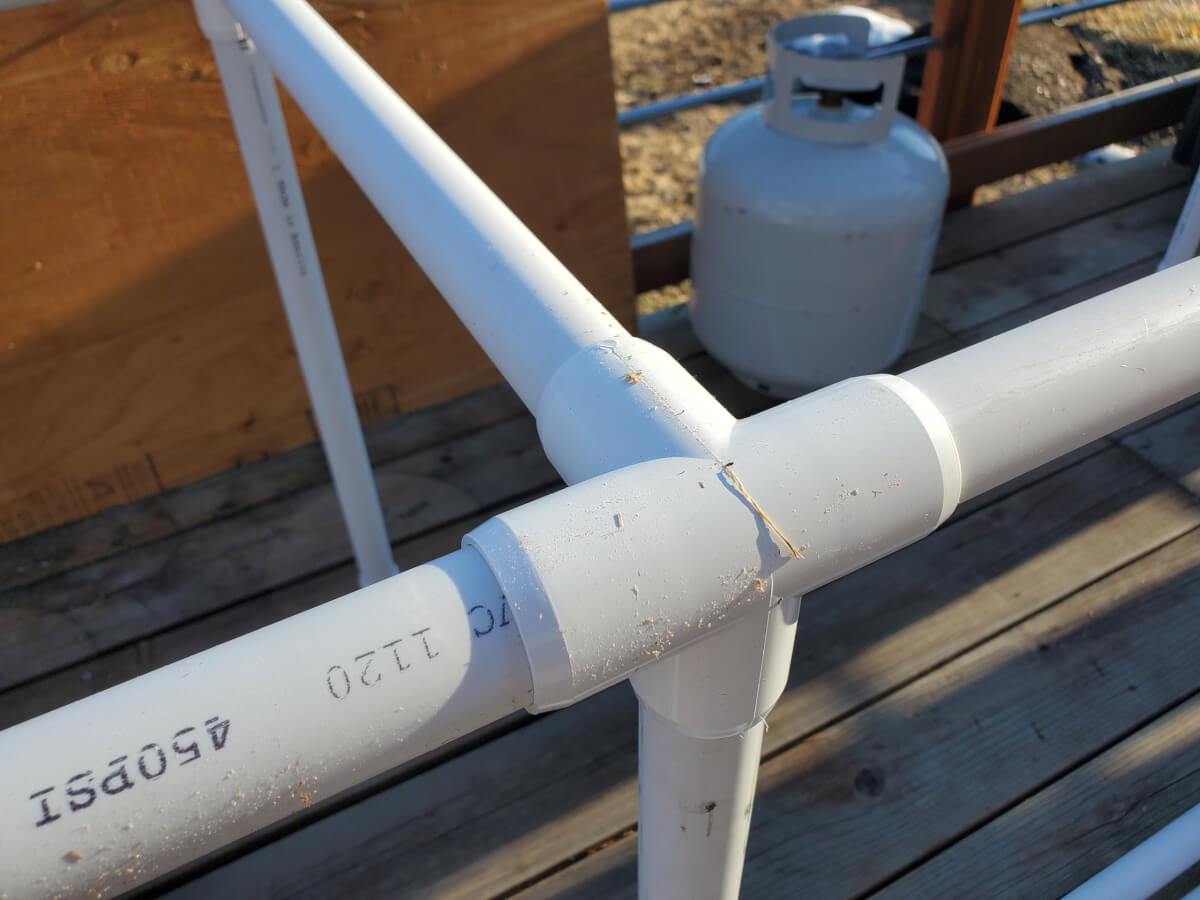
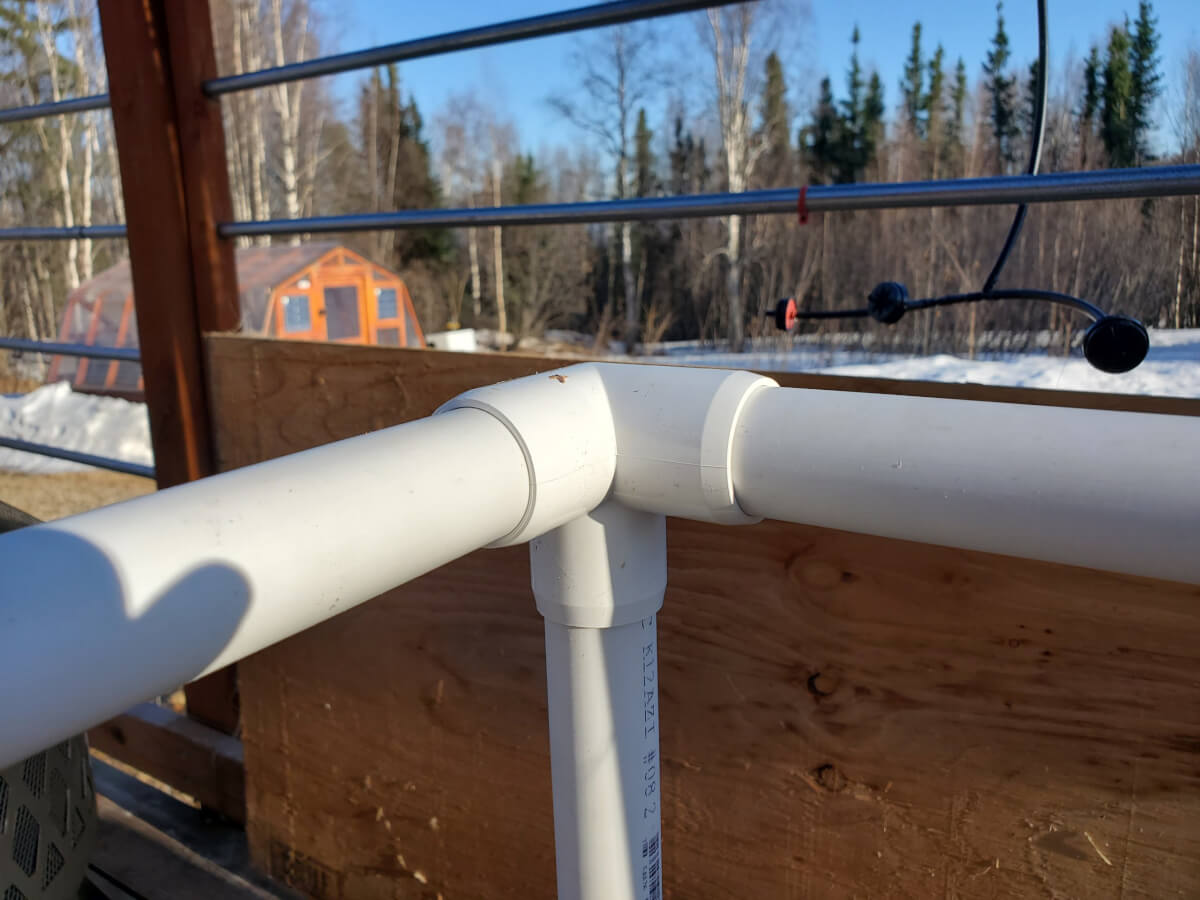
This is called a 4-way PVC fitting, sometimes also referred to as a furniture fitting. We discuss these “special” PVC fittings in the next section.
PVC structures can be easily broken down, if needed. They are lightweight and require few tools to build with. Many different fittings are commercially available for different sized and dimensioned structures.
One could certainly extend the concepts in this post to a semi-permanent design using wood or other materials. Such a small DIY greenhouse could even be built to handle snow loads!
If you want it easy, PVC is an excellent material to build with. But, we wanted you to know that you can easily expand the concept into other greenhouse ideas!
PVC Fittings For The DIY Seedling Greenhouse
If you’d like to pursue a similar build to ours, it’ll be important for you to discover a few PVC fittings that aren’t commonly found at hardware stores.
PVC fittings are usually indicated and sold by their size. This size matches the size of schedule 40 PVC that you will use for your construction.
Again, we selected 1″ PVC as the basis for our DIY seedling greenhouse, so we’d need 1″ fittings!
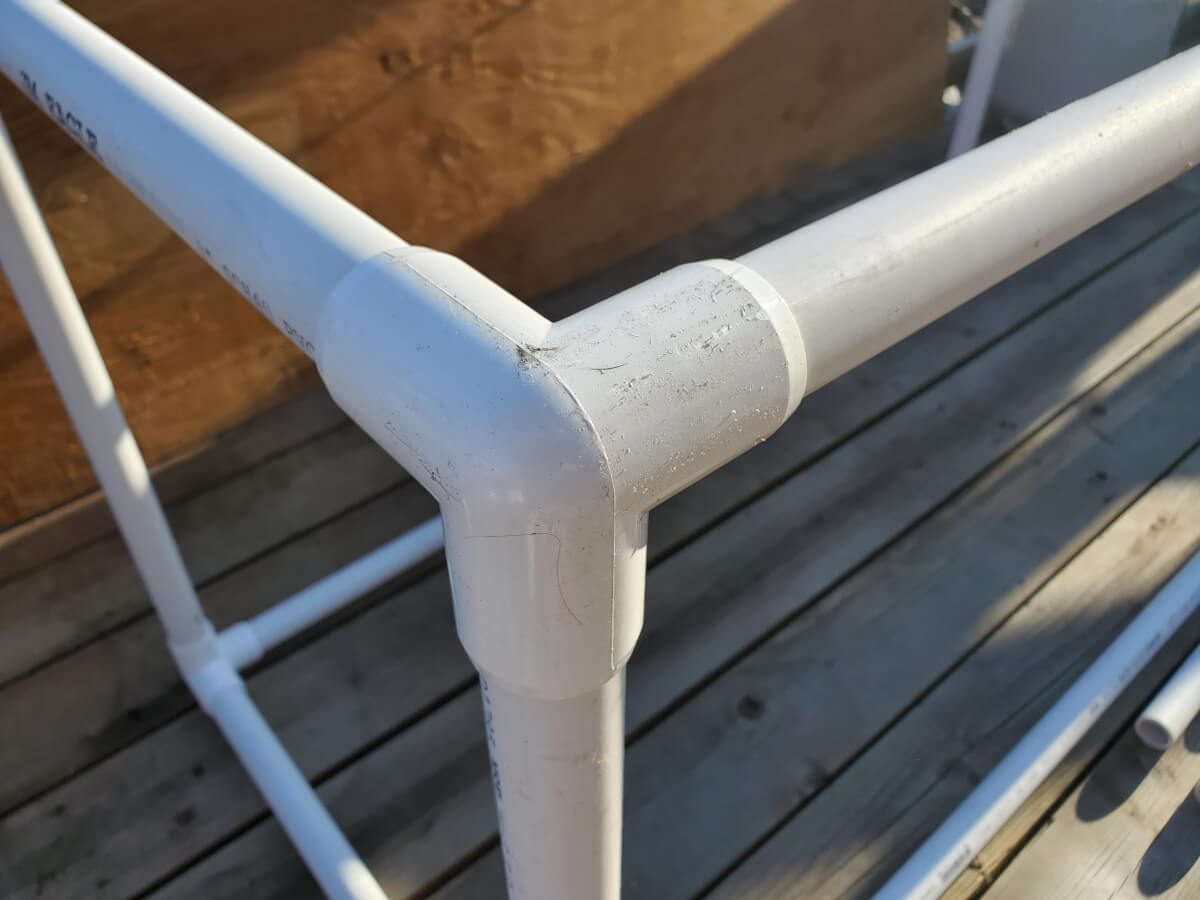
It’s very common to find elbow and tee based PVC fittings at your local hardware store. This structure uses these! But, there’s a few more you need to know about to build PVC structures like this.
This is called a 3-way PVC fitting, sometimes also referred to as a furniture fitting. It’s very helpful for building structures, less helpful for actual plumbing.
There is a “special class” of PVC fittings that are often referred to as “furniture fittings.” These are particularly handy for building structures from PVC. These are more focused on DIY building, less so on plumbing!
- 3-way fittings, sometimes also called side elbows
- 4-way fittings
Although we didn’t use these fittings for our DIY seedling greenhouse build, there are also some additional PVC furniture fittings that you might find helpful for your particular build.
Overall, with these furniture fittings, you should be able to design and build both simple and complex structures. We went with simple, no need to go crazy!
Snap Clamps For Securing Your DIY Seedling Greenhouse Plastic
We’ll eventually get more into this, but there’s a couple of other materials you’ll need for the DIY seedling greenhouse.
You need a way to secure the plastic to the PVC. There is an excellent product for this called a snap clamp. Snap clamps are again sized based on the PVC they will attach to, again in our case we used 1″ snap clamps.
Snap clamps will securely attach fabric, frost cloth or plastic to the PVC. Essentially, it wraps around the PVC and clamps your material to that PVC.
You can see the snap clamps installed along the PVC pieces here. It secures the plastic well to the actual greenhouse structure and keeps the plastic from going anywhere!
Since we’re on the topic of securing your greenhouse plastic, you’ll also need some UV rated greenhouse plastic. It’s important to get UV rated plastic, so it’ll hold up over the long term.
The exact size you’ll need will be heavily dependent on the size of the seedling greenhouse you build. In our case, we calculated that we’d need about 8 foot wide. We found some that was 8 foot wide by 25 foot length.
We do recommend one single piece of plastic, if you can get away with it. This will retain maximum heat and overall make things less complicated.
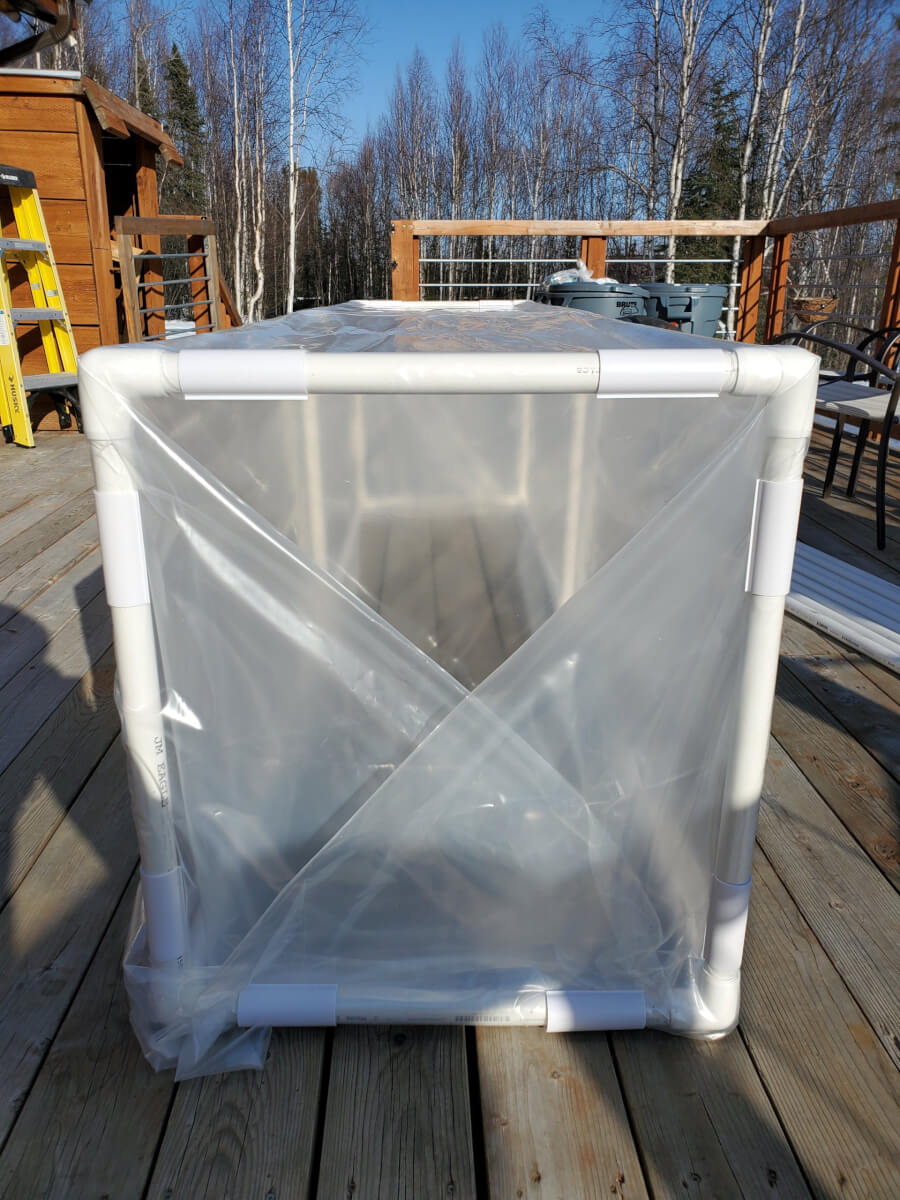
Our Design Of The DIY Seedling Greenhouse
We didn’t want to make anything particularly complicated for our DIY seedling greenhouse. We basically just wanted a rectangle that was big enough for our 1020 trays and tall enough for our plants.
We settled on designing our greenhouse to hold about eight 1020 trays as our target. Technically, we’d only fit seven as we need a little bit of room for our heating and cooling equipment.
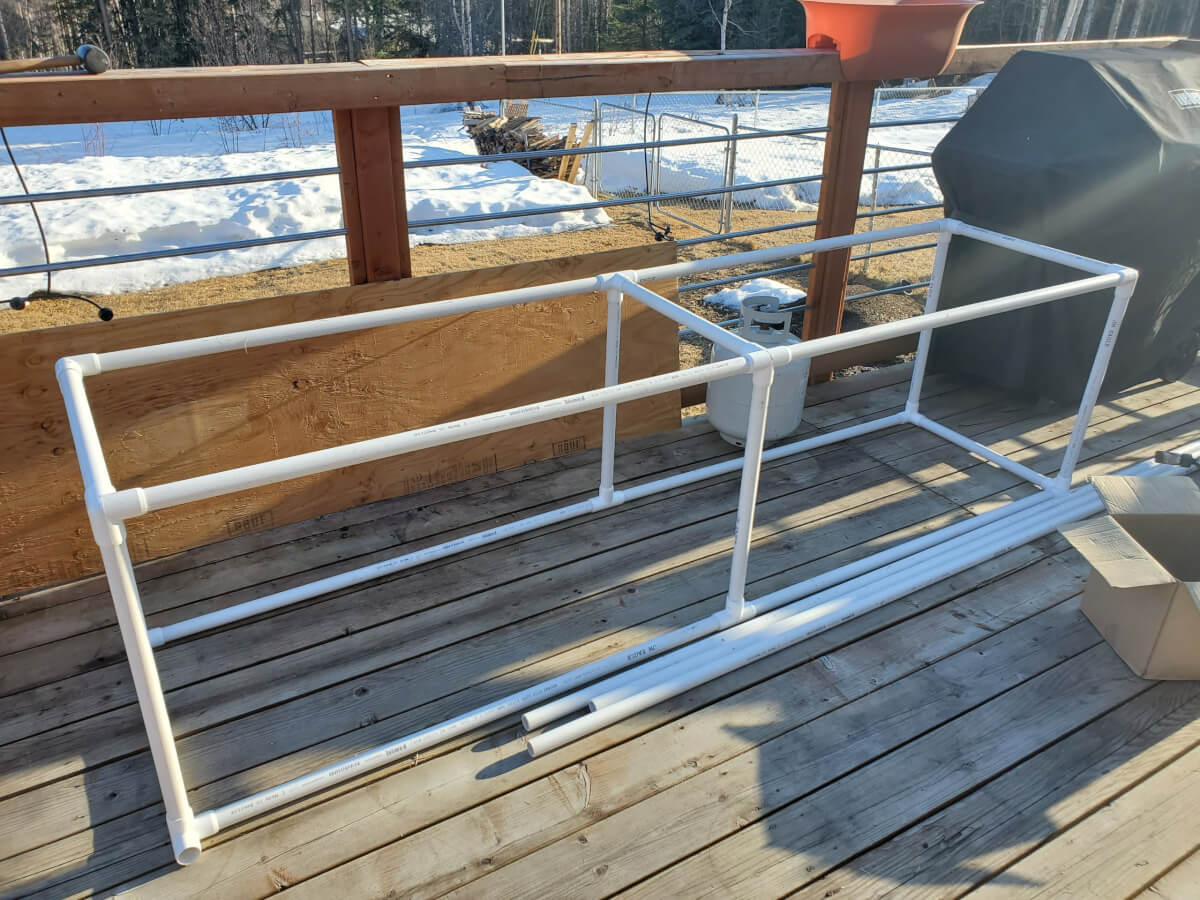
Our DIY seedling greenhouse was built around storing 1020 trays. It was sized to hold seven 1020 trays, plus the necessary heating and cooling equipment that we discuss later.
We decided to make ours somewhat tall, about 2.5 feet (32 inches, actually). The majority of our plants are much shorter than this!
The reason is that we wanted the ability to grow large tomato plants, which could easily get this tall if we start them early enough in the season.
You have a lot of flexibility in the general size of the greenhouse. It can be large, or small. Customize it to your specific needs! The larger the greenhouse, though, the more heat and ventilation you may need to provide.
Constructing Our DIY Seedling Greenhouse
Working with PVC is really easy! You just cut the PVC pieces to length and press fit them onto your fittings.
For our build, we didn’t opt to use “PVC glue” and rather relied on a friction fit. This allows the easy break down of the structure, which may be of particular importance for winter storage.
We like to use a tubing cutter (also called a pipe cutter) for cutting our PVC pieces. This is a really clean way of cutting PVC. Alternatively, you can use a radial saw or other saws. You might have to clean up some burrs with these methods.
We recommend doing some “early” testing to make sure things are coming together the way you wanted. For example, if you are designing it to fit 1020 trays, do the trays actually fit with your measurements?
Once you are confident in your measurements, you can go through a bunch of PVC cutting efforts. We generally cut all of our lengths and then assembled our DIY greenhouse.
You’ll notice that we don’t provide “exact measurements” in our build guide. This stuff isn’t particularly hard to figure out and there’s a ton of flexibility in height, width and length that can be used. Just cut things to your specific needs!
Wrapping The DIY Seedling Greenhouse In UV Plastic
This is the fun part of the project! It’s where we make our project actually start to look and perform like a real greenhouse!
You’ll be using those snap clamps we recommended above to secure the UV greenhouse plastic to the actual greenhouse.
We generally recommend starting at the long sides of the greenhouse, ensuring you have enough length to reach both ends of the greenhouse.
Since we had 8 foot by 25 foot plastic, we “roughly” found the halfway point and worked our way to both ends. We placed a snap clamp every couple feet or so, to make sure we had a secure connection.
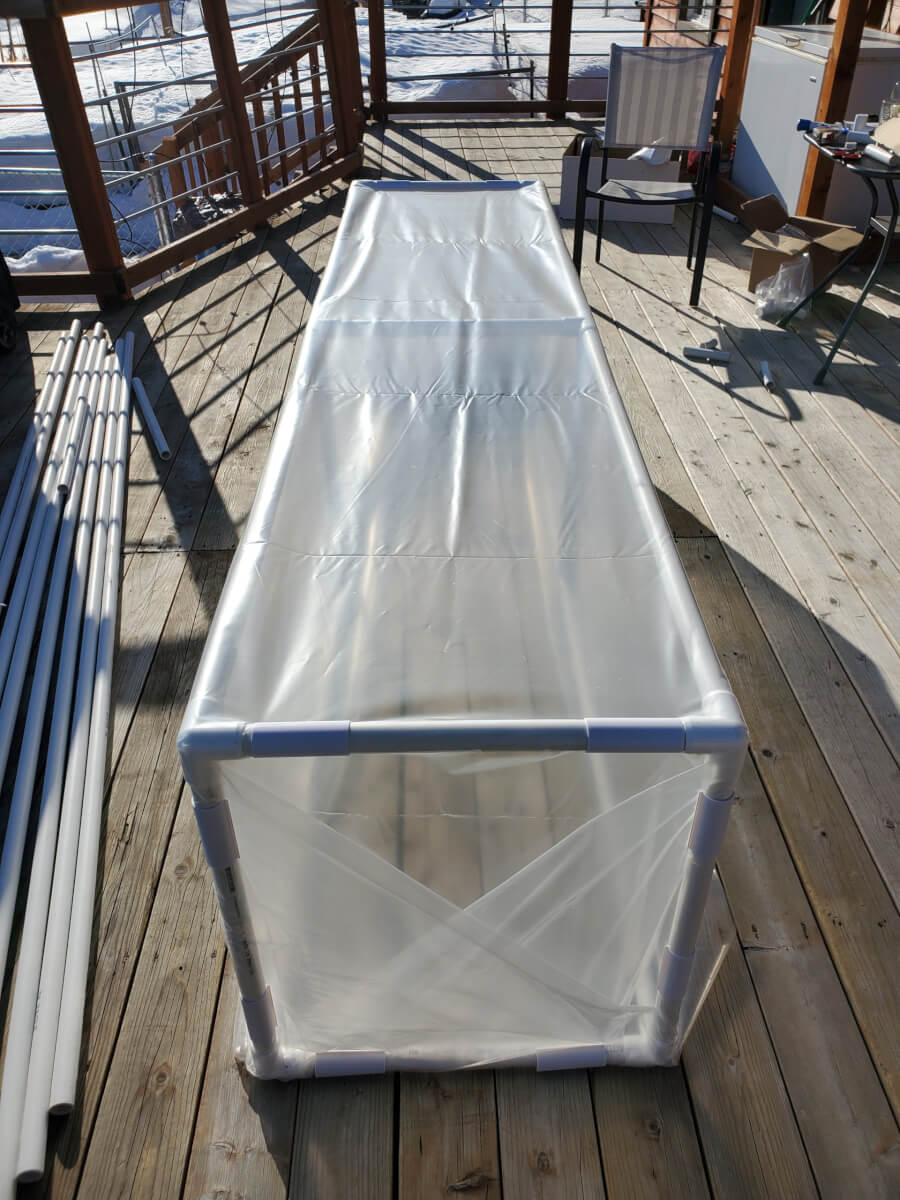
The ends are a little bit tricky. You’ll have some excess that you may need to cut off. No matter what you do, you’ll have a little bit of excess. That excess will need to be secured. The UV plastic isn’t “form fit” to your structure!
It’s a bit like wrapping a Christmas present. You can sort of fold the ends and secure things up with the snap clamps.
Temperature Control Systems For Our DIY Seedling Greenhouse
As we mentioned, we wanted to make sure our DIY seedling greenhouse was fully temperature controlled.
It’s important to be able to both heat and cool any greenhouse. They can trap enough heat to kill plants. They can still get cold enough, at night, to present a danger to your seedlings.
The general equipment we used for our temperature control systems in our greenhouse were as follows:
- Inkbird ITC-308 temperature controller
- 750 watt space heater
- AC Infinity 120mm AC Powered Fan
- High quality, outdoor extension cord (we didn’t have power nearby)
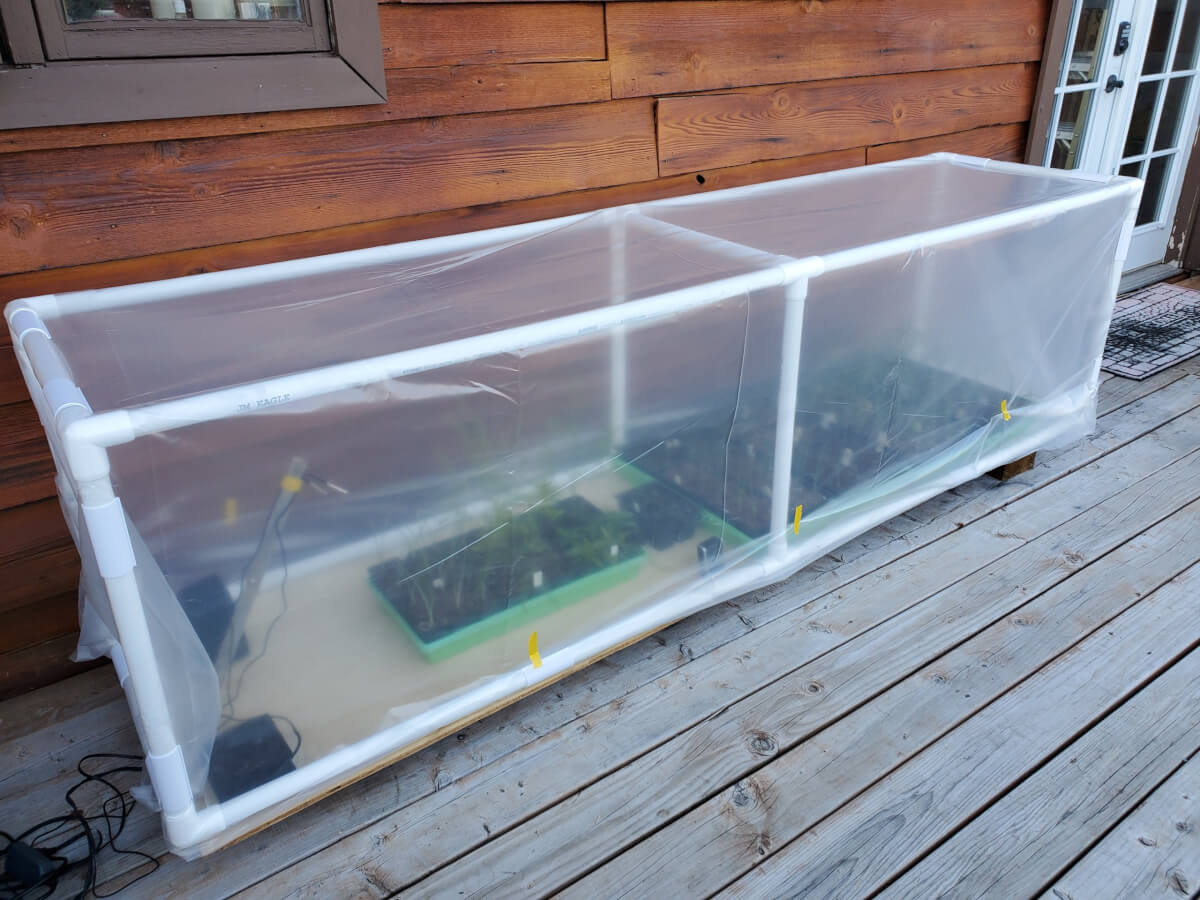
We used one side of our DIY seedling greenhouse to place all of our temperature control systems. In addition, we simply tossed a Rubbermaid tote, upside down, over our sensitive electrical connections to protect them.
We planned to place our DIY greenhouse on a pre-cut piece of plywood. This allowed us to cut a hole for our 120mm fan. We mounted the fan directly to the plywood with the provided screws in our fan kit. The fan was electrically connected to the “cool” side of of the temperature controller.

We use the Inkbird temperature controllers we recommend here a lot! Here’s some of the same controllers in our full size greenhouse! It’s the same concept we used in this seedling greenhouse!
The fan would vent air from inside the greenhouse beneath the greenhouse. As such, we had to “prop up” that plywood piece on a few pieces of scrap 2×4 material we had lying around. This allows the vented air to escape beneath the greenhouse.
The heating side is really simple. Just put the heater in the greenhouse and connect it to the “heat” side of the temperature controller.
Also, we should call this out specifically. It’s very important to use a 750 watt (or less) space heater. The temperature controller we recommend here is only capable of handling 10 amps. A common 1,500 watt space heater would exceed this capability and could be dangerous!
Our DIY Seedling Greenhouse Temperature Controller Settings
The temperature controller we recommended above is a little bit limited. It uses the concept of a “set temperature” and then cooling and heating “differentials” from that set temperature to determine whether it should cool or heat.
After playing around with small temperature controlled greenhouses a fair bit, we generally like to have the “set temperature” be about 45F degrees.
We used 5F degree cooling differential and a 5F degree heating differential.
This will cause the temperature controller to do the following:
- Turn the heater on at 40F degrees, bring the greenhouse up to 45F degrees, then turn the heater off.
- Turn the fan on at 50F degrees, “try” to bring the greenhouse down to 45F degrees, then turn the fan off.
In practice, what will happen on the heating side is almost perfect for what we want it to do. It will guard your plants from experiencing frost or cold temperature problems and generally try to keep the greenhouse around 45 degrees overnight.

This is one of our seedling trays on a particularly cold morning. We found this greenhouse design to be fully capable of keeping our seedlings safe, even down to about 15-20F nights!
On the cooling side, you’ll find that the fan operates most of the day. Especially on days with direct sunlight. This is actually just fine as it provides good air circulation. The small fan we recommended above is quite power efficient, so it’s not going to rack up a large power bill.
The single 120mm fan is really not enough to “actually” cool your greenhouse to the suggested temperature. This greenhouse design is simply too efficient, the sun can easily warm up your the greenhouse more than the fan will cool it.
The fan can keep the greenhouse from achieving plant-killing temperatures though! We’d often see peak temperatures in the 90’s.
General Performance & Capabilities Of Our DIY Seedling Greenhouse
Anytime we go into a project like this, we really have no idea how well it will work until we actually build it.
Overall, we were extremely pleased with this DIY seedling greenhouse. We experienced several low evening temperatures that dipped into the teens, this greenhouse was fully up to the task!
We did find on particularly warmer days, especially as we approached last frost dates, it was best to remove the greenhouse from our plants. It could get really hot in this greenhouse!
Fortunately, it’s quite lightweight and easy to lift off of our plants. We’d always make sure to put it back on once we reached the cooler, evening temperatures.
You could probably solve this issue with additional fans. Possibly an “intake” and “output” type of design, one on each side of the greenhouse. It takes a surprising amount of ventilation to keep a well sealed greenhouse cool!
You might also consider internal air circulation. We didn’t find this necessary, but a larger greenhouse build might benefit from it.
Compared to our older methods, we were much happier with the build quality and longevity we could see out of this DIY seedling greenhouse. You’d still need to replace the plastic on occasion, but at least not every single year!
If you’re in a situation where you can’t build a “real” greenhouse, for whatever reason, this is a relatively inexpensive build that can get you that early season protection without breaking the bank.
Ultimately, we executed nearly this exact same concept on our actual greenhouse. We sealed our “real” greenhouse with UV rated plastic and were able to do exactly this, but at a much larger scale!
While we currently use our “real” greenhouse for our seedlings these days, we still have these PVC frames ready to go, if we ever need them. Should we ever go even larger scale, they may come in handy.
Solving Cold Climate Growing Problems
We hope this article helps you with a little bit of inspiration for your own DIY seedling greenhouse build!
Having the ability to get your plants outside, sooner in the season, has many measurable benefits! When you can use “free” outdoor sun, it can save you a ton of money on indoor grow lighting.
For us, it has allowed us to scale our garden start production to much higher levels. Our plants are healthier and “ready to go” at the beginning of the garden season this way!
Perhaps surprisingly, we have done the testing on costs, comparing indoor grow lighting against temperature control of greenhouses. Heating a greenhouse wins! It’s even cheaper for us to heat our “big” greenhouse over running indoor grow lighting!
As always, if you have any thoughts, comments or questions, we encourage you to slap a comment down below!
That’s All We Wrote!

Having a good time? Learn something? We have an ever growing list of insightful and helpful subarctic & cold climate gardening articles, just like this one!
- Cold Climate Gardening Basics 👉
- Growing Your Garden From Seed Indoors 👉
- Advanced Cold Climate Gardening Techniques 👉
- Plant Specific Cold Climate Growing Guides 👉
- Subarctic Perennial Food Forests & Foraging 👉
- Indoor Garden Lighting & Grow Rooms 👉
- Greenhouses & Temperature Control 👉
- Harvesting & Food Preservation 👉
- Solving Cold Climate Garden Problems 👉
- 700+ 1 Minute Reads 👉
- 180+ Gardening Topics! 👉
FrostyGarden.com is 100% ad-free, junk free and we do not use affiliate links or sponsorships! This resource is voluntarily supported by our readers. (Like YOU!) If we provided you value, would you consider supporting our mission?
I just finished making mine. It’s not even winter in the Upper Midwest, but I’m already planning for spring planting. My one question is if/how you secure the greenhouse to the raised platform (without puncturing the plastic) so the whole thing doesn’t blow away.
That’s a great question, which I didn’t address in this article. One method would be to use conduit clamps, sized for the PVC you use. (e.g. 1/2″, 1″, 1.25″, etc) One side could be loosely secured, to allow almost like a hinge-like operation. Alternatively, you could secure the entire operation with bricks, rope or some other mechanism. (Like perhaps two weights, say bricks, at either end with a rope tied between.) In general, you’d want something easily removable so the greenhouse is accessible and generally avoid things that will permanently secure the system. We don’t have super high winds here, so it’s not often something I consider. But, as long as you’re not having to secure against tornadoes and hurricanes, a reasonable amount of protection should be adequate.
Thank you. I have thought about weights as well, but wanted to see if there were other options.
Excellent writeup, thanks for sharing.
I want to build a rectangle shaped green house that you have described/built. However, I would like to use the heating pad instead of space heater. But I am wondering what’s the best way to ventilate such a set up. Is it enough to poke some small holes in the plastic? Would that work? Just curious about your thoughts.
Thanks for your comment! Holes in the plastic are a double edged sword. They certainly will vent excess heat, but also allow any applied heat (which costs $) to escape. The easiest and cheapest option is to simply prop open the greenhouse during those warmer days. But, for a more automated solution, we opted to put our greenhouse on a plywood base and connected temperature controlled fans to a couple of holes in that base. These draw cooler air in, helping to maintain the temperature within the greenhouse. Hope that helps!